Nvidia Inspector: Download, How To Use (Setting Up)
In this guide, you will learn how to configure and use Nvidia Inspector version 1.9.8.6 and higher
Download for Windows / Linux
Download releases Download from guru3d
What is Nvidia Inspector
Nvidia Inspector - is a multifunctional software for configuring the operation of a video card. With it, you can create a working profile with setting the clock speed and fan speed to meet your requirements. In addition, energy saving can be used in the application.
Nvidia Inspector allows you to avoid overheating of the graphics adapter, increase FPS. Has a graphical shell. You can also use the command line. Initially, the utility was developed for overclocking video cards to run demanding games. The application also helps if there is no SLI support.
How to use Nvidia Inspector
Step 1 - Download Software
First of all, go to the official website and click to download NVidia Inspector. Extract the archive to any convenient folder. 
Step 2 - Install the Application Software
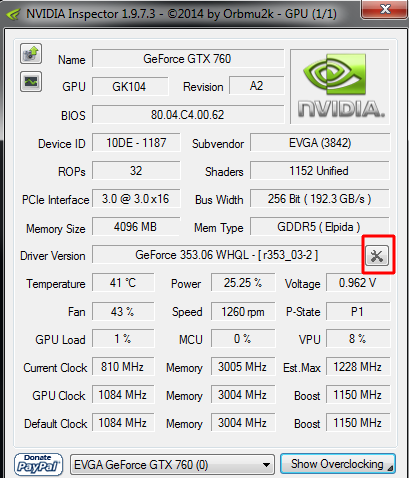
Run the downloaded file. The configurator is in English, so a translator may be required. The main window of the software displays the characteristics of the video adapter. However, we need to start the program. To do this, look down the windows to make sure the program has detected the correct hardware. If not, then click on this item.

This window contains all the hardware information for the video card.
There are two buttons in the upper left corner:
- The first button uploads a screenshot of the application to Techpowerup.org.
- The second button below will open hardware monitoring.

To the right of the Driver Version field is a button that opens the Game Profiles Plugin for Inspector - Driver Profile Settings.

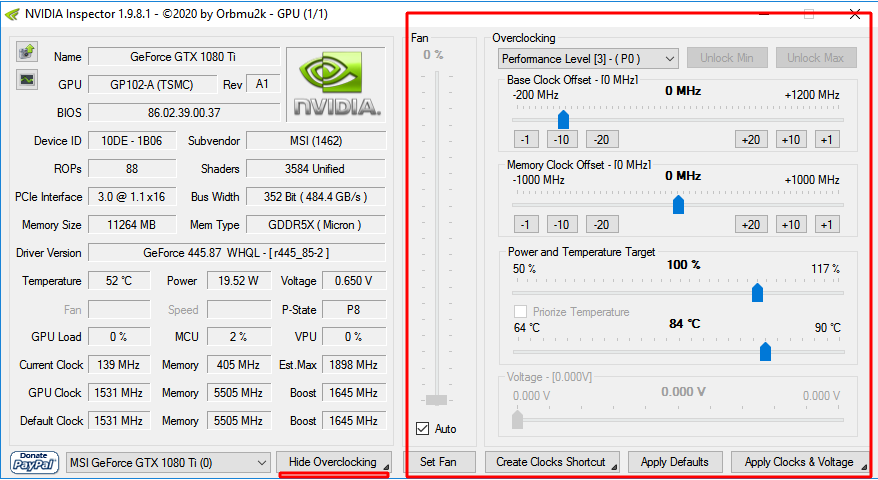
Finally, at the bottom, there is a banner allowing donations, a drop-down box that allows you to switch between multiple GPUs, and a button that opens the overclocking panel. When you click the Show Overclocking button, an overclocking warning will appear before opening the panel.

You try to enter the experimental overclocking section.
These options could harm your hardware or may destroy it physically.
Are you aware of the risks and still want to show overclocking options?
In the window that appears, select the desired program for which the settings will be used. If it is not in the list, then click on the icon with a green plus sign to indicate the path to the required file. All parameters are displayed in the list that appears. Some will be familiar, others will not. We are interested in the settings for the performance of the graphics card. To do this, click the Show overclocking button. The following settings are made here:

- Fan speed. Using the "Set Fan" button, you can set a specific value.
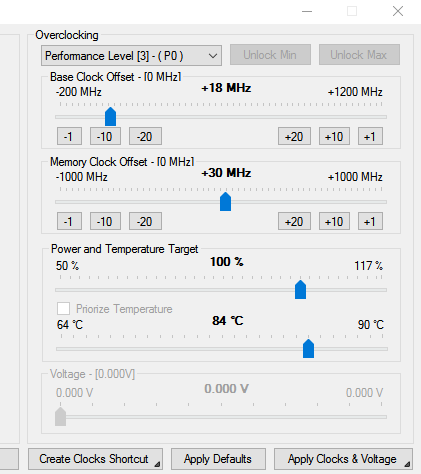
- Frequency change. Base Clock Offset.
- Changing the clock frequency of the video memory. Item Memory Clock.
- Indication of the voltage indicator. Voltage item.
Step 3 - tune performance
For overclocking use the last three commands (Memory Clock, Base Clock Offset and Voltage). The first command will help keep your graphics card safe. Overclock carefully. Enter each indicator separately: specify the parameter → see the operation of the card → change the next parameter. You can confirm the selected parameters by clicking on the "Apply Clocks & Voltage" button. Next, run 3DMark or another tester to test the device's performance. 
Video Guide
Important notes!
- Disable g-sync in nvidia control panel if you care more about input lag over game smoothness.
- If you use your monitor/tv speakers, check “hd audio” in nvslimmer or your audio won’t work!
- If you use geforce experience for clips then you could just download it from here after you have finished following the video so that u are able to use all of it’s features if needed: https://www.nvidia.com/en-me/geforce/geforce-experience/
How to optimize your hidden nvidia settings for gaming in 2021 - nvidia tweak guide!
Sensor Monitoring
Sensor monitoring can be very useful when testing hardware stability, performing overclocking, testing mods, or when testing new settings or changes to those settings. For this, the Inspector includes 21 monitors. Of these, the most useful will be determined by the task for which the monitors are used.
Setting up monitors
To open the monitors, click the [Sensor Monitoring] button located in the upper left corner of the main screen.
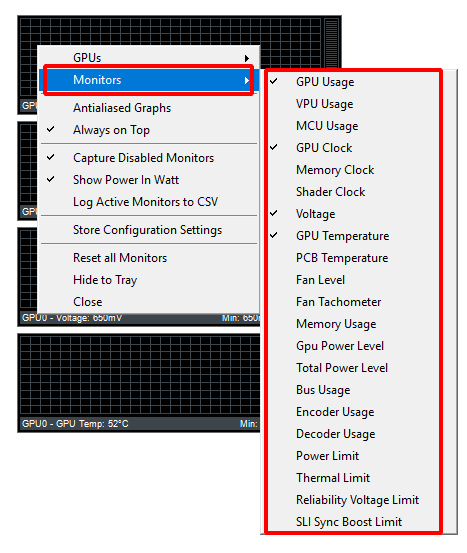
Once opened, monitors remain in front of all other windows by default. To change monitors, simply right-click the monitor window and hover your mouse pointer over Monitors. Monitors with a check mark next to them will be displayed. Users can display only one or all of them.
-
Graphics Cards (GPUs)- Allows users to choose which graphics card they want to control. Several graphics cards are designed for SLI users. -
Monitors- Provides a list of all available monitors. -
Antialiased Graphs- makes the graphs less jagged. -
Always on Top- whether monitor windows will stay on top of other windows or not. -
Capture Disabled Monitors- Whether to capture all monitor data or only monitors displayed in the Monitors menu. Enabled by default. -
Log Active Monitors to CSV(Log Active Monitors to CSV) - whether to log active monitors to a CSV file for later viewing the data. -
Store Configuration Settings- when this option is selected, active monitors will be saved for the next Inspector opening; otherwise, the default monitor set will appear when you close and reopen Inspect. -
Reset All Monitors- Resets the monitors to start over. -
Hide to Tray- minimizes the monitor window to the system tray. This is useful for long term monitoring of your system. -
Close- closes the monitor window.
if drivers are downloaded auto do this:
How to Disable Automatic Driver Downloads on Windows 10
- Right click the Start button and select Control Panel
- Make your way to System and Security.
- Click System.
- Click Advanced system settings from the left sidebar.
- Select the Hardware tab.
- Press the Device Installation Settings button.
- Choose No, and then press the Save Changes button.
Alternatives
- NVIDIA nTune - no need to flash BIOS.
- RivaTuner - no need to flash BIOS.
- NVIDIA BIOS Editor 6.06 (NiBiTor) - you need to flash.
- ThrottleStop - no need to flash.
- GPU-Z - no need to flash.
Troubleshooting
- Download Microsoft .NET Framework
- To uninstall, download .NET Framework Cleanup Tool


