XMRig: Download, Configure for mining Monero and Altcoins
This guide covers how to start and how to use the latest XMRig version 6.21.3 and higher.
Download for Windows / Linux
Download from site Download from Github
What is XMRig?
XMRig – is a console software that employs special commands to mine cryptocurrencies such as Monero (XMR). For it to work, you need to create a configuration file. The miner works with a processor (CPU) and video cards (AMD and Nvidia).
DevFee: commission is set in the range from 1 to 5 percent. The default is the maximum value.
XM Rig is free executable software licensed under the GNU GPL v3. It is available for Linux and Windows.
how to use XMRig
Step 1 - Download the program
There are two ways to download the program:
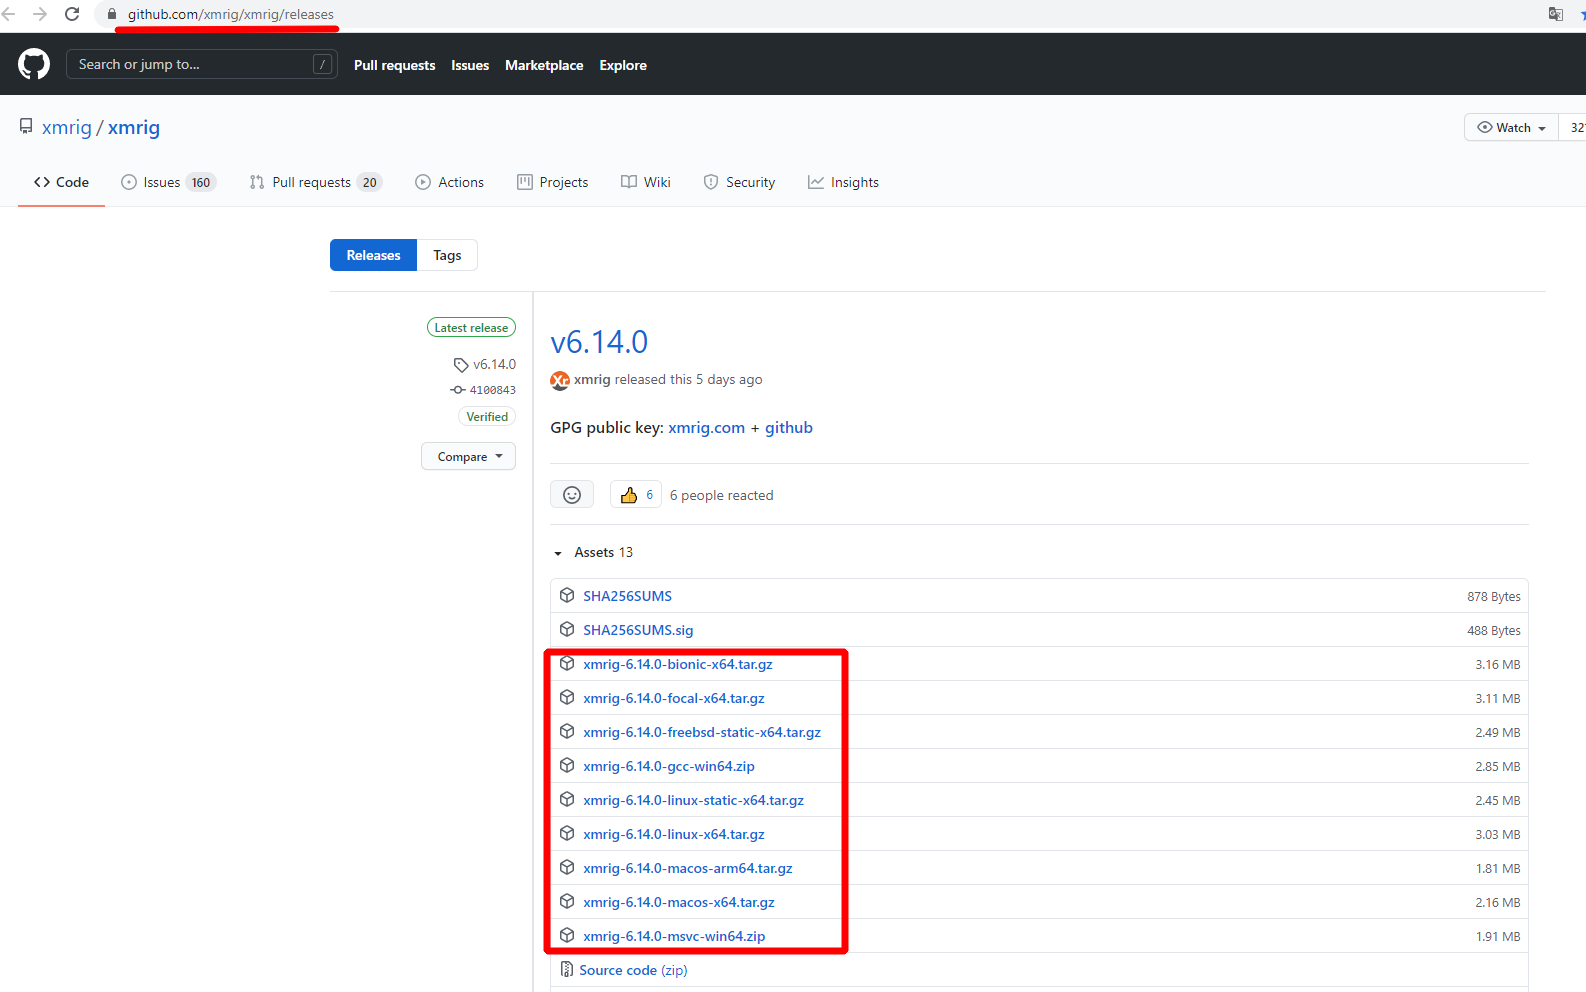
On GitHub releases, scroll down to "Assets" and download the latest version available.
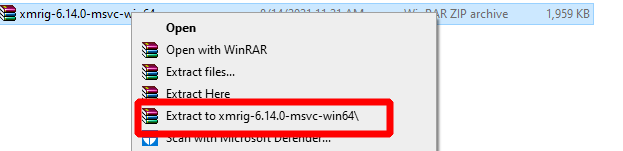
Unzip the downloaded file to a location convenient for you.
Step 2 - Configure the program
In the same folder as you xmrig.exe, create a file monero.bat with the following content:
xmrig -o pool.minexmr.com:443 -u 84XFxjQVYoJjQBeyfbcYBgJ1tw4cgywGyTp12nQw3mSKZctgMYuPGRH1y2LuBAS8yyT8ZX2NDS3CXbfFAxdXQJwAGMoMDSq -k --tls
pause
Just replace XFxjQVYoJjQBeyfbcYBgJ1tw4cgywGyTp12nQw3mSKZctgMYuPGRH1y2LuBAS8yyT8ZX2NDS3CXbfFAxdXQJwAGMoMDSq with your Monero wallet address.
The file with the extension .bat is created in any text editor.
Step 3 - Run the miner
After creating or editing a file monero.bat, just double-click it, a terminal window will appear and you will start mining!
The bottom line displays the hash rate.
Video Tutorial
Source: bytwork.com - XMRig Miner setup.
Nicehash command line
There are two ways to use Nicehash:
- Use the Nicehash shell itself.
- Use only XMRig console.
Let’s consider the second option. To do this, we need to create a .bat file with the following text:
-
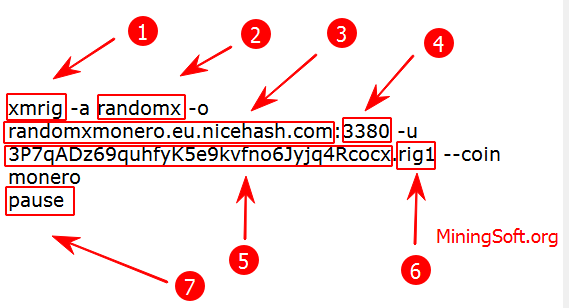
xmrig– indicates that this particular program is being launched. This does not need to be changed. -
randomx– the parameter indicates which algorithm will be used for mining. If you want to mine Ravencoin using the kawpow algorithm, then registerkawpow. -
-o- after this parameter, the address of the pool is entered. Indicate the one that you want to use for mining cryptocurrency. -
:3380- immediately put a colon after the address, and indicate the port number. -
-u- enter the address of the cryptocurrency wallet. You can open it on the cryptocurrency exchange or through crypto wallet programs. Enter3P7qADz69quhfyK5e9kvfno6Jyjq4Rcocxyour Nicehash wallet address instead. -
.rig1- is the name of your device. This is necessary for the convenience of tracking statistics. Any value can be specified.
Example:
xmrig -a randomx -o randomxmonero.eu.nicehash.com:3380 -u 3P7qADz69quhfyK5e9kvfno6Jyjq4Rcocx.rig1 --coin monero
 pause
At the end of the batch file, we recommend adding the command pause. It will pause the program if an error occurs. Otherwise, the software just closes. With a pause, you can see the type of error or misspelled syntax and fix the problem.
If you use the Nicehash shell itself:
To reduce the number of mining threads, you need to follow these steps:
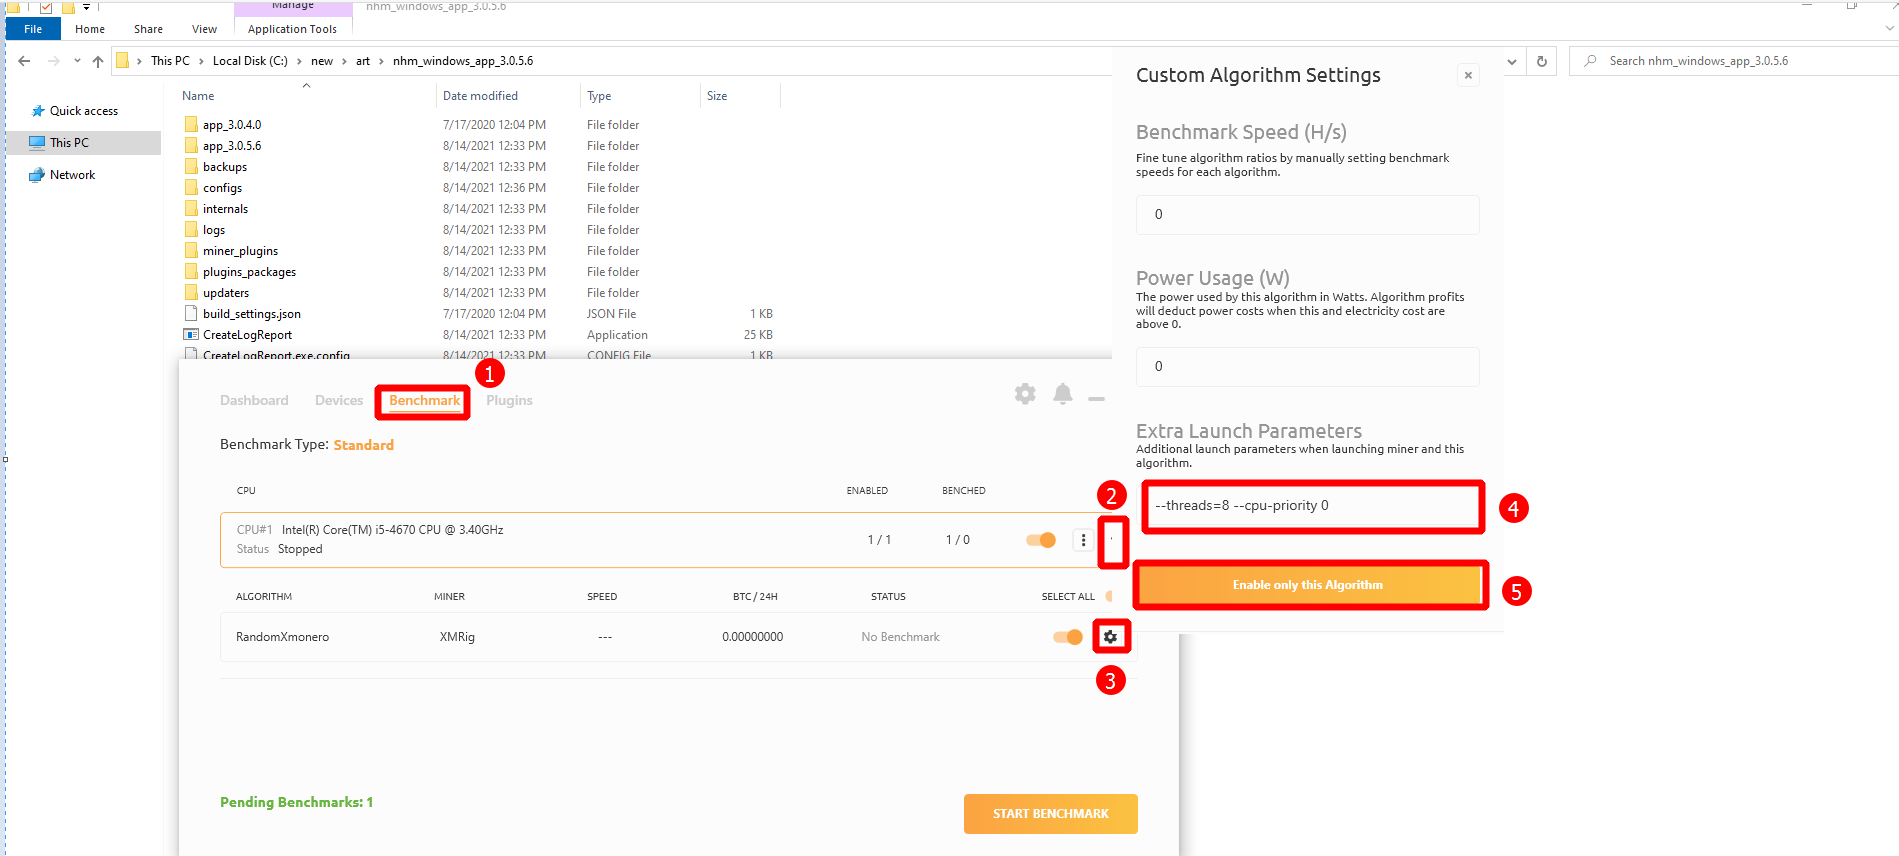
- Click the Benchmark tab.
- Choose your processor and XMRig.
- Click on the settings gear.
- Find the “Extra Launch Parameters” text box and write down
--threads=N, whereNis is the number of threads you want to use. - Click the “Enable only this Algorithm” button.
An example of using 8 threads:
--threads=8
In This video I show you how to set your threads in XMRIG this will work for XMRIG and all forks of XMRIG including MoneroOceans XMRIG-MO for Windows 10
Line To COPY:
xmrig.exe -a gr -o stratum-na.rplant.xyz:17056 -u RNrTxXxKkvdKJp7ZjKjGgZ1kKZeTUFyTVy.RabidWS -p x --threads=32
An example of reducing CPU usage:
--cpu-priority 0
The command --cpu-priority is responsible for specifying the priority under which the miner will run in the OS. Available Values:
- 0 - low,
- 1 - below average,
- 2 - medium,
- 3 - above average,
- 4 - high,
- 5 - real time (maximum).
Setting for Nvidia (CUDA) and AMD (opencl)
If you want to mine on video cards too, then enter the key --cuda to use Nvidia cards.
Example for Nvidia:
:start
 xmrig -a randomx -o pool.supportxmr.com:5555 -u 4FBSiJSfXqPiiir33MpaZ9cqP4f4RsEyNChUQtfpMA95XtgJvWYyhcdRZ5KPhbWznBh2PGiFAtEYQZ3FynQVhsGj51wnp1ZeQvEA8VtNVH.rig1 -p x --donate-level=1 --cuda --coin monero
 goto start
Enter the key --opencl to use AMD.
Example for AMD:
:start
 xmrig -a randomx -o pool.supportxmr.com:5555 -u 4FBSiJSfXqPiiir33MpaZ9cqP4f4RsEyNChUQtfpMA95XtgJvWYyhcdRZ5KPhbWznBh2PGiFAtEYQZ3FynQVhsGj51wnp1ZeQvEA8VtNVH.rig1 -p x --donate-level=1 --opencl --coin monero
 goto start
This completes the batch file setup. Below we will provide commands for a more advanced configuration of the program.
Config.json file
The setting in the batch file may not be sufficient for maximum efficiency. It is worth using the configuration file. In the folder, it is called config and has the extension .json. It is analogous to a batch file for running the program. This procedure is necessary to achieve the desired performance.
Open the file config.json in any text editor and edit the attribute pools as follows:
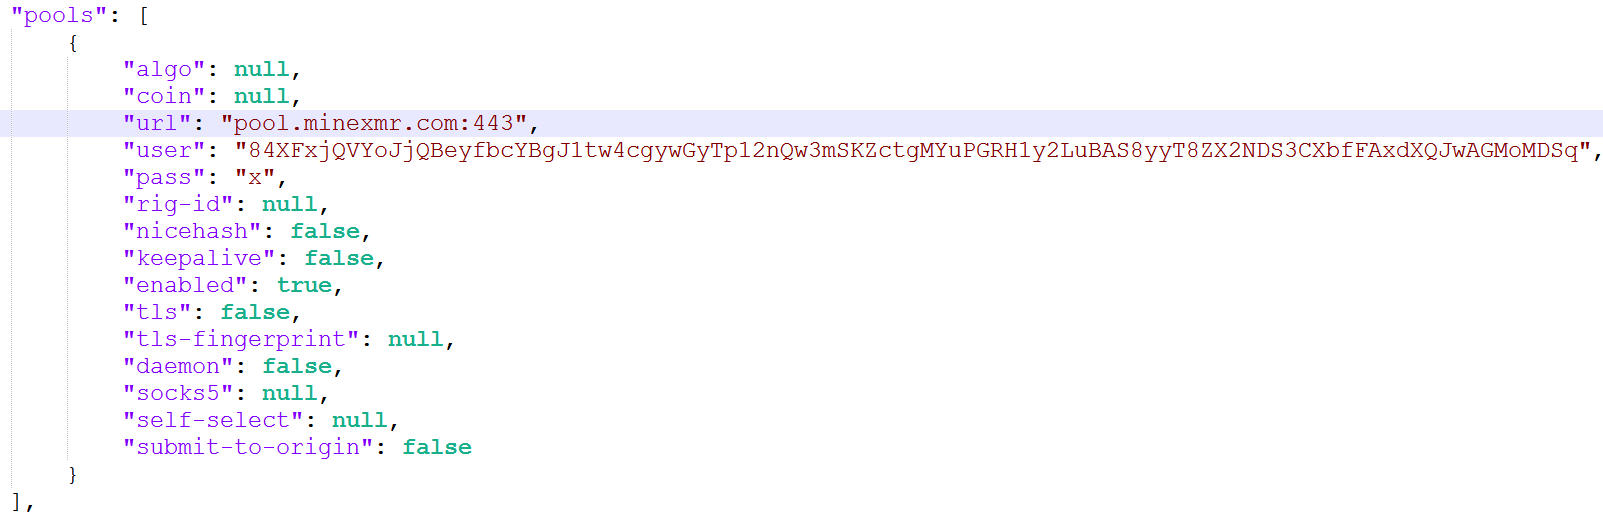
Here is the complete line of code:
{
    "api": {
        "id": null,
        "worker-id": null
    },
    "http": {
        "enabled": false,
        "host": "127.0.0.1",
        "port": 0,
        "access-token": null,
        "restricted": true
    },
    "autosave": true,
    "background": false,
    "colors": true,
    "title": true,
    "randomx": {
        "init": -1,
        "init-avx2": -1,
        "mode": "auto",
        "1gb-pages": false,
        "rdmsr": true,
        "wrmsr": true,
        "cache_qos": false,
        "numa": true,
        "scratchpad_prefetch_mode": 1
    },
    "cpu": {
        "enabled": true,
        "huge-pages": true,
        "huge-pages-jit": false,
        "hw-aes": null,
        "priority": null,
        "memory-pool": false,
        "yield": true,
        "asm": true,
        "argon2-impl": null,
        "astrobwt-max-size": 550,
        "astrobwt-avx2": false,
        "argon2": [0, 1, 2, 3],
        "astrobwt": [0, 1, 2, 3],
        "cn": [
            [1, 0],
            [1, 1],
            [1, 2]
        ],
        "cn-heavy": [
            [1, 0],
            [1, 1]
        ],
        "cn-lite": [
            [1, 0],
            [1, 1],
            [1, 2],
            [1, 3]
        ],
        "cn-pico": [
            [2, 0],
            [2, 1],
            [2, 2],
            [2, 3]
        ],
        "cn/upx2": [
            [2, 0],
            [2, 1],
            [2, 2],
            [2, 3]
        ],
        "rx": [0, 1, 2],
        "rx/wow": [0, 1, 2, 3],
        "cn/0": false,
        "cn-lite/0": false,
        "rx/arq": "rx/wow",
        "rx/keva": "rx/wow"
    },
    "opencl": {
        "enabled": false,
        "cache": true,
        "loader": null,
        "platform": "AMD",
        "adl": true,
        "cn/0": false,
        "cn-lite/0": false
    },
    "cuda": {
        "enabled": false,
        "loader": null,
        "nvml": true,
        "cn/0": false,
        "cn-lite/0": false
    },
    "log-file": null,
    "donate-level": 1,
    "donate-over-proxy": 1,
    "pools": [
        {
            "algo": null,
            "coin": null,
            "url": "pool.minexmr.com:443",
            "user": "84XFxjQVYoJjQBeyfbcYBgJ1tw4cgywGyTp12nQw3mSKZctgMYuPGRH1y2LuBAS8yyT8ZX2NDS3CXbfFAxdXQJwAGMoMDSq",
            "pass": "x",
            "rig-id": null,
            "nicehash": false,
            "keepalive": false,
            "enabled": true,
            "tls": false,
            "tls-fingerprint": null,
            "daemon": false,
            "socks5": null,
            "self-select": null,
            "submit-to-origin": false
        }
    ],
    "retries": 5,
    "retry-pause": 5,
    "print-time": 60,
    "health-print-time": 60,
    "dmi": true,
    "syslog": false,
    "tls": {
        "enabled": false,
        "protocols": null,
        "cert": null,
        "cert_key": null,
        "ciphers": null,
        "ciphersuites": null,
        "dhparam": null
    },
    "dns": {
        "ipv6": false,
        "ttl": 30
    },
    "user-agent": null,
    "verbose": 0,
    "watch": true,
    "pause-on-battery": false,
    "pause-on-active": false
}
After launching the program, the following information will be displayed:
GeForce модель карты @ 2300/2920 MHz 16х39 8х25 arch:52 SMX:13
This suggests that 16 threads are used for 39 blocks, bfactor is 8x, as well bsleep 25. The architecture 52 with a multiprocessor is used SMX 13. The data varies depending on the video card or processor model. They display the settings for the video adapter.
To get optimal performance, you need to experimentally adjust them. For example, if the PC freezes while mining a token, then reduce the amount of threads used and bfactor. For each individual video card in the farm, you can write data separated by commas. In this case, an index is indicated, which is the identifier of the system used.
Xmrig proxy setup
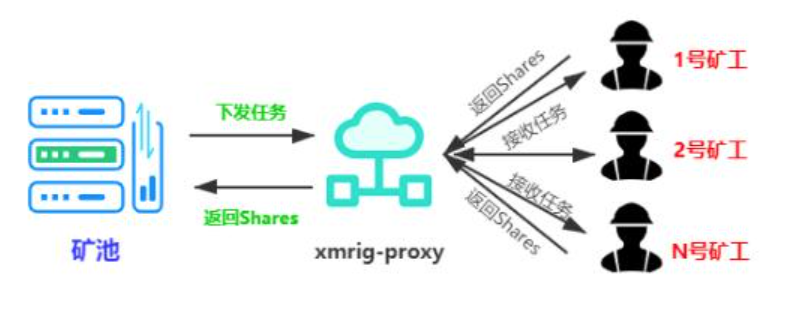
Xmrig-proxy (miner proxy pool) is an additional transmission channel between miners and pools. Xmrig-proxy not only takes on the role of the mining pool, but also takes on the responsibility of the miner. Xmrig-proxy receives tasks from the pool and then assigns them to miners to perform computations (in this sense, it takes on the role of the mining pool).
After the calculation is complete, the miners send the shares to xmrig-proxy, then xmrig-proxy send the data to the mining pool.
So, under what circumstances should xmrig-proxy be used?
- Miners with a large number of devices can use xmrig-proxy to centrally manage computing power.
- When there are many miners connected to a specific IP address that send shares (solutions) too often, the pool will consider this as a DDoS attack and that IP address will be blocked by the mining pool. At this time, you can install a proxy.
- The mining pool is far away and an agent has been added to improve network connectivity.
Xmrig-proxy usage guide:
- Download the XMRig Proxy version and unzip it.
After unpacking, you will see two files:
xmrig-proxy.exeandconfig.json(there will also be minor files:SHA256SUMSandstart.bat).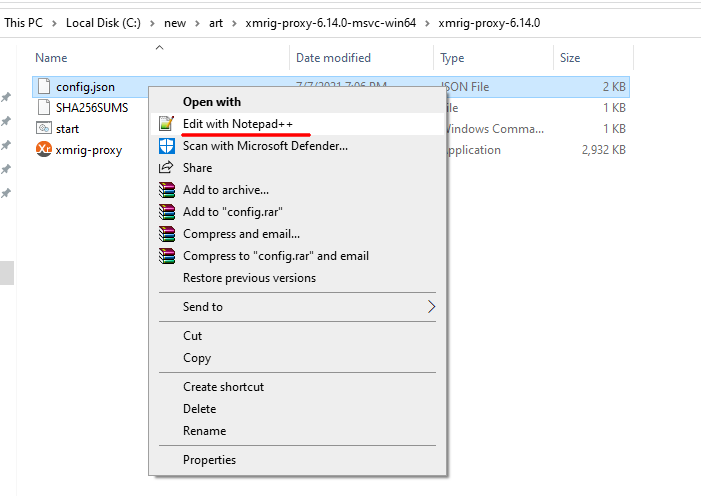 Right click to edit the file. Notepad++ editor to edit
The mining port can be used by default, if you have special needs, you can change it yourself. After modification, save and exit.- Double click
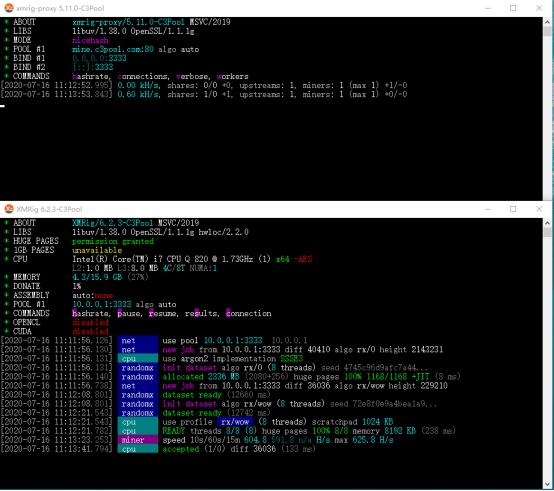
xmrig-proxyto start it and start the proxy pool service. Look at the interface as in the following figure, it means your agent has been started successfully. You may need to allow it to run. Click “Allow access”.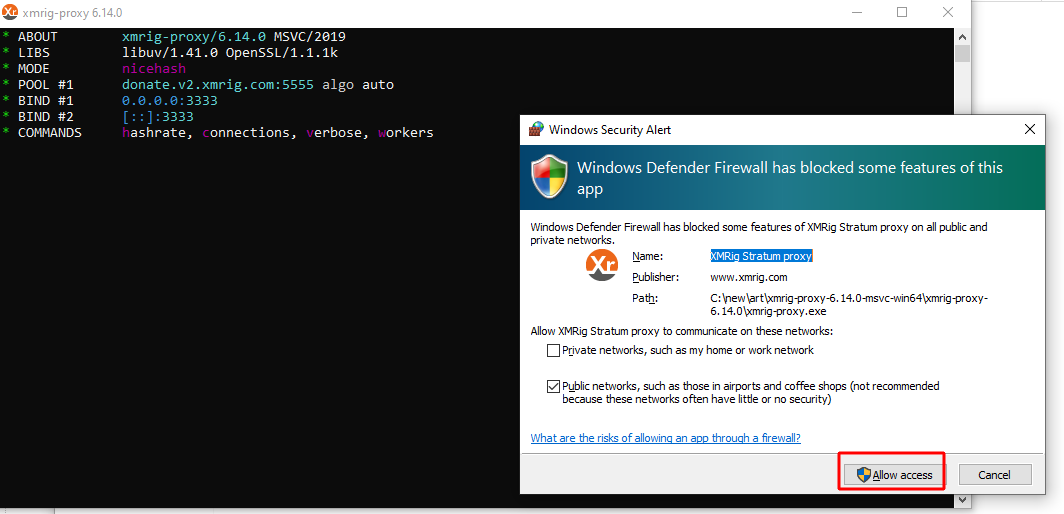
- After successfully launching Xmrig-proxy, we need to change the address of the mining pool
IP:PORTto where the xmrig-proxy is located. The rest do not need to be changed.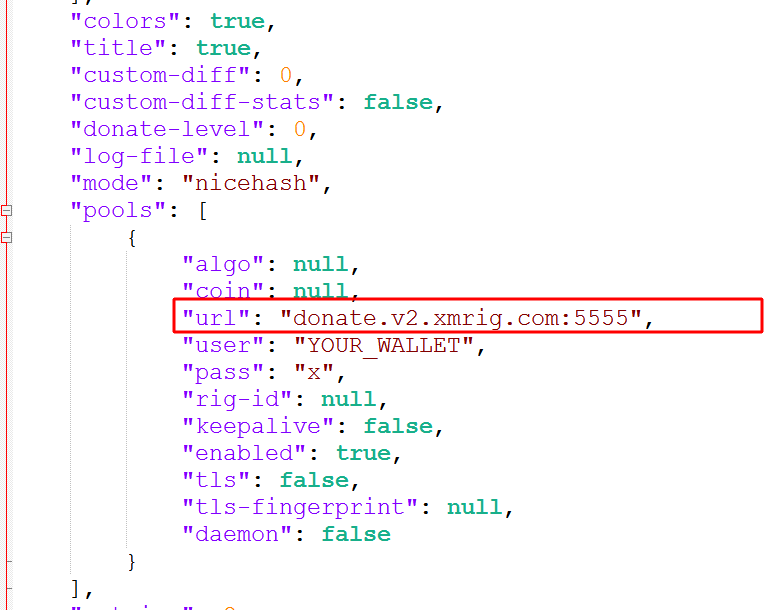
Change the parameter "url": to your IP:
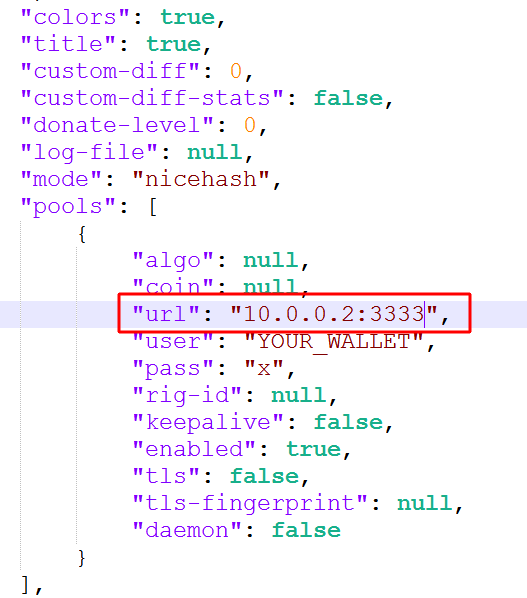
Then run xmrig like below:
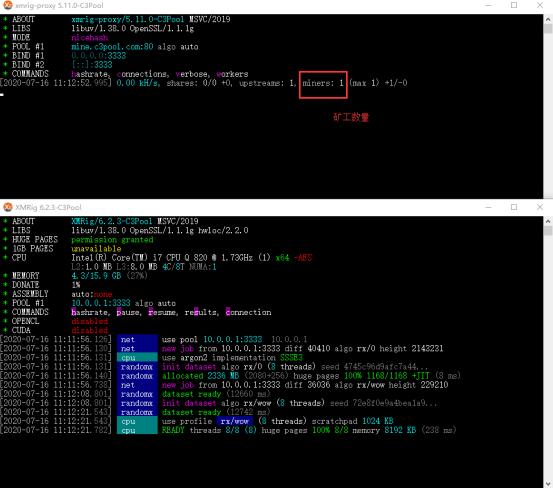
You will see all the miners on the network:
How to check hashrate
In the XMrig proxy miner, you can check the hash rate, results and status of video cards. There are two ways to view the data:
- Through the console.
- via API.
By default, the hash rate is displayed every minute. You can use the command --print-time to change this indicator.
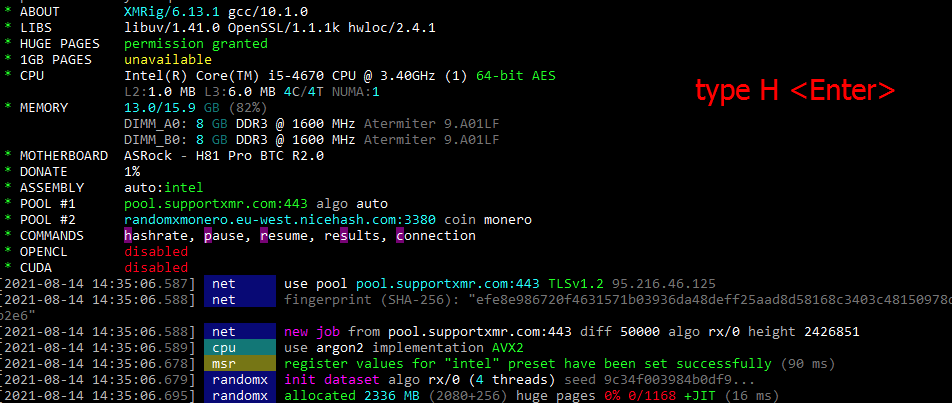
In the miner window, you need to press the following keys:
H - to display the hashrate value. E - to show the performance of the graphics adapter. P - to press pause. R - to resume work.
-
H– to display the hashrate value. -
E– to show the performance of the graphics adapter. -
P– to press pause.. -
R– to resume work.
If the program sends shares to the pool, an alert is shown accepted. In case of problems with the configuration, the system issues rejected.
MSR Mod
MSR Mod – is hardware prefetching to solve fundamental performance problems. RandomX’s algorithm accesses memory randomly, so prefetching just doesn’t work.
Sometimes prefetching can be turned off in BIOS. For Intel, this is usually setting Hardware Prefetcher and adjoining Cache Line Prefetch. However, some MSRs cannot be disabled even in the BIOS. In all the places where prefetching can help, there are already explicit prefetch instructions in your code.
The solution is to set up prefetching using MSRs at the OS level.
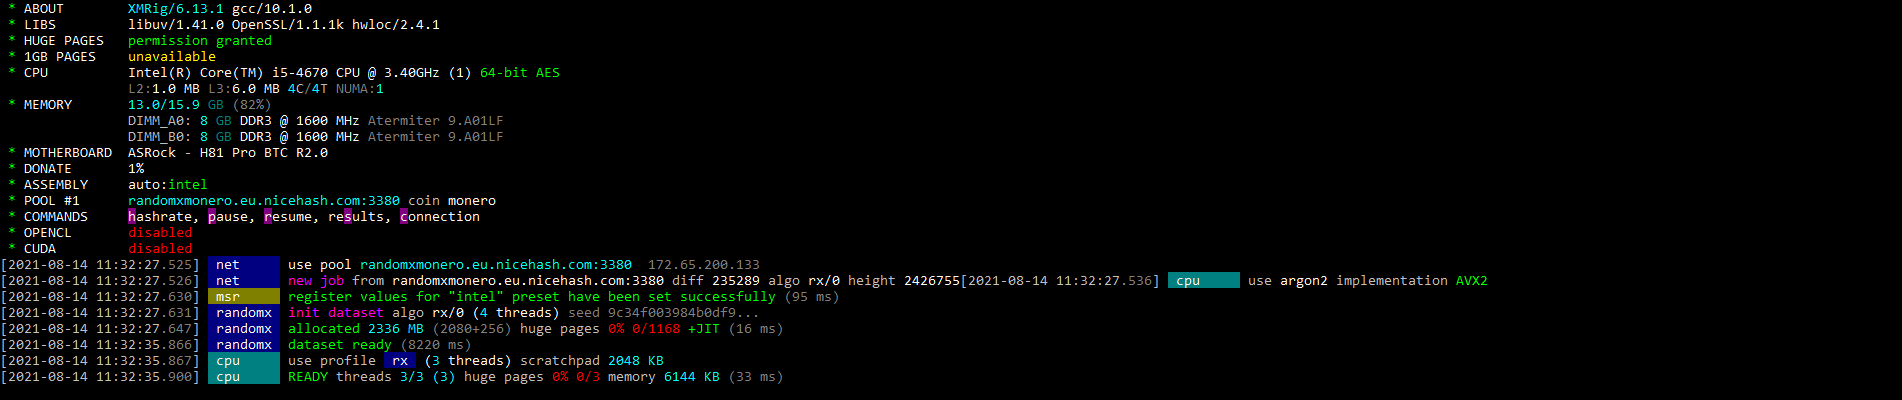
If you are running the latest version of XMRig with root (Linux) or Administrator (Windows) rights, the miner automatically configures all MSR registers. If everything is in order, the miner has received all the necessary privileges and your processor supports them, you will see a line as shown below in the miner’s log.
msr register values for "intel" preset has been set successfully (16 ms)
Some hardware / software configurations also need to be disabled Secure Boot for the MSR mod to work, check issue #1891 on github.
Supported processors:
- Intel (Nehalem, Westmere, Sandy Bridge, Ivy Bridge, Haswell, Broadwell and newer).
- Ryzen (all Zen-based processors: Ryzen, Threadripper, EPYC).
XMRig restores the original MSR values by default on exit, in any case the changes are not saved, restarting the computer will always discard any changes.
Performance tuning
There “randomx” are 2 options available for configuration in an object:
"rdmsr""wrmsr"
Option rdmsr:
Use "rdmsr": false to disable initial MSR recovery on exit.
Option WRMSR:
"wrmsr": true (default) Enable the feature MSRor. Use "wrmsr": false to disable the MSR feature.
WRMSR number:
"wrmsr": 15 Available for Intel only. The default 15 for Intel is generally good, but may not be better, see discussion № 1433 on github.
WRMSR array:
A very advanced format for fine tuning. Use with care. Preset values supplied with the miner:
"wrmsr": ["0x1a4:0xf"] Intel preset.-
"wrmsr": ["0xc0011020:0x4480000000000", "0xc0011021:0x1c000200000040:0xffffffffffffffdf", "0xc0011022:0xc000000401500000", "0xc001102b:0x2000cc14"]AMD Ryzen (Zen3). -
"wrmsr": ["0xc0011020:0x0", "0xc0011021:0x40:0xffffffffffffffdf", "0xc0011022:0x1510000", "0xc001102b:0x2000cc16"]AMD Ryzen (Zen1/Zen2). -
"wrmsr": ["0xc0011020:0x0", "0xc0011021:0x60", "0xc0011022:0x510000", "0xc001102b:0x1808cc16"]Special configurable value for first generation Zen processors (with known hardware error) to disable opcache and enable MSR mod.
Also, the performance is greatly improved by the parameter “huge pages”.
Watch the video:
The CPU Affinity. parameter also increases the performance.
CPU Affinity is software binding (binding) to processor cores of specific computing processes.
An example of a command in a batch file:
--cpu-affinity 0x155
Use the online calculator to find the CPU Affinity values for your processor.
Command line arguments
It is important to understand before reading the list that this list of commands comes in two flavors: the long command name and its short synonym.
You only need to select and use one command option:
- Or a long command name.
- Or a short synonym.
For example, if two commands are specified:
-o, --url=URL
We use either:
-o
or:
--url=URL
An example of using the short command:
-o pool.supportxmr.com:443
An example of using the long version of the command:
--url=pool.supportxmr.com:443
Network:
-
-o,--url=URLURL of mining server -
-a,--algo=ALGOmining algorithm https://xmrig.com/docs/algorithms -
--coin=COINspecify coin instead of algorithm -
-u,--user=USERNAMEusername for mining server -
-p,--pass=PASSWORDpassword for mining server -
-O,--userpass=U:Pusername:password pair for mining server -
-x,--proxy=HOST:PORTconnect through a SOCKS5 proxy -
-k,--keepalivesend keepalived packet for prevent timeout (needs pool support) -
--nicehashenable nicehash.com support -
--rig-id=IDrig identifier for pool-side statistics (needs pool support) -
--tlsenable SSL/TLS support (needs pool support) -
--tls-fingerprint=HEXpool TLS certificate fingerprint for strict certificate pinning -
--dns-ipv6prefer IPv6 records from DNS responses -
--dns-ttl=NN seconds (default: 30) TTL for internal DNS cache -
--daemonuse daemon RPC instead of pool for solo mining -
--daemon-poll-interval=Ndaemon poll interval in milliseconds (default: 1000) -
--self-select=URLself-select block templates from URL -
--submit-to-originalso submit solution back to self-select URL -
-r, –retries=N number of times to retry before switch to backup server (default: 5) -
-R, –retry-pause=N time to pause between retries (default: 5) -
--user-agentset custom user-agent string for pool -
--donate-level=Ndonate level, default 1%% (1 minute in 100 minutes) -
--donate-over-proxy=Ncontrol donate over xmrig-proxy feature
CPU backend:
-
--no-cpudisable CPU mining backend -
-t,--threads=Nnumber of CPU threads, proper CPU affinity required for some optimizations. -
--cpu-affinity=Nset process affinity to CPU core(s), mask 0x3 for cores 0 and 1 -
-v,--av=Nalgorithm variation, 0 auto select -
--cpu-priority=Nset process priority (0 idle, 2 normal to 5 highest) -
--cpu-max-threads-hint=Nmaximum CPU threads count (in percentage) hint for autoconfig -
--cpu-memory-pool=Nnumber of 2 MB pages for persistent memory pool, -1 (auto), 0 (disable) -
--cpu-no-yieldprefer maximum hashrate rather than system response/stability -
--no-huge-pagesdisable huge pages support -
--huge-pages-jitenable huge pages support for RandomX JIT code -
--asm=ASMASM optimizations, possible values: auto, none, intel, ryzen, bulldozer -
--argon2-impl=IMPLargon2 implementation: x86_64, SSE2, SSSE3, XOP, AVX2, AVX-512F -
--randomx-init=Nthreads count to initialize RandomX dataset -
--randomx-no-numadisable NUMA support for RandomX -
--randomx-mode=MODERandomX mode: auto, fast, light -
--randomx-1gb-pagesuse 1GB hugepages for RandomX dataset (Linux only) -
--randomx-wrmsr=Nwrite custom value(s) to MSR registers or disable MSR mod (-1) -
--randomx-no-rdmsrdisable reverting initial MSR values on exit -
--randomx-cache-qosenable Cache QoS -
--astrobwt-max-size=Nskip hashes with large stage 2 size, default: 550, min: 400, max: 1200 -
--astrobwt-avx2enable AVX2 optimizations for AstroBWT algorithm
OpenCL backend:
-
--openclenable OpenCL mining backend -
--opencl-devices=Ncomma separated list of OpenCL devices to use -
--opencl-platform=NOpenCL platform index or name -
--opencl-loader=PATHpath to OpenCL-ICD-Loader (OpenCL.dll or libOpenCL.so) -
--opencl-no-cachedisable OpenCL cache -
--print-platformsprint available OpenCL platforms and exit
CUDA backend:
-
--cudaenable CUDA mining backend -
--cuda-loader=PATHpath to CUDA plugin (xmrig-cuda.dll or libxmrig-cuda.so) -
--cuda-devices=Ncomma separated list of CUDA devices to use -
--cuda-bfactor-hint=Nbfactor hint for autoconfig (0-12) -
--cuda-bsleep-hint=Nbsleep hint for autoconfig -
--no-nvmldisable NVML (NVIDIA Management Library) support
API:
-
--api-worker-id=IDcustom worker-id for API -
--api-id=IDcustom instance ID for API -
--http-host=HOSTbind host for HTTP API (default: 127.0.0.1) -
--http-port=Nbind port for HTTP API -
--http-access-token=Taccess token for HTTP API -
--http-no-restrictedenable full remote access to HTTP API (only if access token set)
TLS:
-
--tls-gen=HOSTNAMEgenerate TLS certificate for specific hostname -
--tls-cert=FILEload TLS certificate chain from a file in the PEM format -
--tls-cert-key=FILEload TLS certificate private key from a file in the PEM format -
--tls-dhparam=FILEload DH parameters for DHE ciphers from a file in the PEM format -
--tls-protocols=Nenable specified TLS protocols, example: “TLSv1 TLSv1.1 TLSv1.2 TLSv1.3” -
--tls-ciphers=Sset list of available ciphers (TLSv1.2 and below) -
--tls-ciphersuites=Sset list of available TLSv1.3 ciphersuites
Logging:
-
-l,--log-file=FILElog all output to a file -
--print-time=Nprint hashrate report every N seconds -
--health-print-time=Nprint health report every N seconds -
--no-colordisable colored output -
--verboseverbose output
Misc:
-
-c, –config=FILE load a JSON-format configuration file -
-B, –background run the miner in the background -
-V, –version output version information and exit -
-h, –help display this help and exit -
--dry-runtest configuration and exit -
--export-topologyexport hwloc topology to a XML file and exit -
--titleset custom console window title -
--no-titledisable setting console window title -
--pause-on-batterypause mine on battery power -
--pause-on-active=Npause mine when the user is active (resume after N seconds of last activity) -
--stressrun continuous stress test to check system stability -
--bench=Nrun benchmark, N can be between 1M and 10M -
--submitperform an online benchmark and submit result for sharing -
--verify=IDverify submitted benchmark by ID -
--seed=SEEDcustom RandomX seed for benchmark -
--hash=HASHcompare benchmark result with specified hash -
--no-dmidisable DMI/SMBIOS reader
Review
Key Features:
- Open source for study is provided.
- Has high performance.
- The miner officially supports Windows.
- Supports the RandomX algorithm, which was adopted by the popular digital coin Monero.
- The program also works with NiceHash service.
- Apart from RandomX, the software also runs on CryptoNight.
The program uses the CUDA plugin for the miner. Used in separate versions of the program. It is optional and therefore not included in the main software. Moreover, this technology is demanding on the compiler version, and therefore conflicts often arise with the processor code.
Doesn’t work?
The efficiency of mining digital tokens depends on the correct setting of the miner. If you enter the parameters incorrectly, then the program simply will not start or generate an error. However, when using the advanced configuration: adjusting the parameters of the video card, core frequency, etc., then there is a risk of faster wear of the equipment.
If launch is still not possible, visit thematic forums. Most of the problems have already been discussed and have a solution. The main thing is to correctly enter your query into the search engine. You can also see all the information on GitHub. In the same place, consult with other users.
Alternatives
Are there alternatives? Yes, for example:
GPU mining:
Flash bios program:
Algorithms
| Name | Memory | Version | Description | Notes | |
| cn/upx2 | 128 KB | 6.12.0+ | CryptoNight-Femto (variant of CryptoNight V2 for Uplexa). | ||
| argon2/chukwav2 | 1 MB | 6.4.0+ | Argon2id (Chukwa v2). | CPU only | |
| cn/ccx | 2 MB | 6.2.0+ | Conceal (CCX) | ||
| kawpow | - | 6.0.0+ | KawPow (Ravencoin) | GPU only, not supported by xmrig-proxy | |
| rx/keva | 1 MB | 5.9.0+ | RandomKEVA (RandomX variant for Keva). | ||
| astrobwt | 20 MB | 5.8.0+ | AstroBWT (Dero). | ||
| cn-pico/tlo | 256 KB | 5.5.0+ | CryptoNight-Pico (Talleo). | ||
| rx/sfx | 2 MB | 5.4.0+ | RandomSFX (RandomX variant for Safex). | ||
| rx/arq | 256 KB | 4.3.0+ | RandomARQ (RandomX variant for ArQmA). | ||
| rx/0 | 2 MB | 3.2.0+ | RandomX (Monero). | ||
| argon2/chukwa | 512 KB | 3.1.0+ | Argon2id (Chukwa). | CPU only | |
| argon2/ninja | 256 KB | 3.1.0+ | Argon2id (NINJA) | CPU only | |
| rx/wow | 1 MB | 3.0.0+ | RandomWOW (RandomX variant for Wownero). | ||
| cn/fast | 2 MB | 3.0.0+ | CryptoNight variant 1 with half iterations. | ||
| cn/rwz | 2 MB | 2.14.0+ | CryptoNight variant 2 with 3/4 iterations and reversed shuffle operation. | ||
| cn/zls | 2 MB | 2.14.0+ | CryptoNight variant 2 with 3/4 iterations. | ||
| cn/double | 2 MB | 2.14.0+ | CryptoNight variant 2 with double iterations. | ||
| cn/r | 2 MB | 2.13.0+ | CryptoNightR (Monero's variant 4). | ||
| cn-pico | 256 KB | 2.10.0+ | CryptoNight-Pico. | ||
| cn/half | 2 MB | 2.9.0+ | CryptoNight variant 2 with half iterations. | ||
| cn/2 | 2 MB | 2.8.0+ | CryptoNight variant 2. | ||
| cn/xao | 2 MB | 2.6.4+ | CryptoNight variant 0 (modified). | ||
| cn/rto | 2 MB | 2.6.4+ | CryptoNight variant 1 (modified). | ||
| cn-heavy/tube | 4 MB | 2.6.4+ | CryptoNight-Heavy (modified). | ||
| cn-heavy/xhv | 4 MB | 2.6.3+ | CryptoNight-Heavy (modified). | ||
| cn-heavy/0 | 4 MB | 2.6.0+ | CryptoNight-Heavy. | ||
| cn/1 | 2 MB | 2.5.0+ | CryptoNight variant 1. | ||
| cn-lite/1 | 1 MB | 2.5.0+ | CryptoNight-Lite variant 1. | ||
| cn-lite/0 | 1 MB | 0.8.0+ | CryptoNight-Lite variant 0. | ||
| cn/0 | 2 MB | 0.5.0+ | CryptoNight (original). | ||
Is it a virus or is the program safe?
XMRig is not malware. This is a legal cryptocurrency mining program.
However, many malware creators and operators of large botnets embed xmrig-cuda.dll in their malware in order to use other people’s computers to mine cryptocurrency without their permission. This is why antivirus software treats XMRig as malware due to the large number of computers infected with malware associated with it.
Total:
- If you downloaded the program yourself from the official source on Github or xmrig.com, then there is nothing to worry about.
- If you have never downloaded this program yourself, uninstall it immediately.
Therefore, some antivirus scanners consider the program to be malicious because antiviruses do not distinguish between intentional (conscious) mining and hidden mining (when cryptocurrency is mined without your knowledge). In the latter case, you need to remove the program from the system.
How to remove?
If the virus has recently begun to act, then go to the system folder and look at the date the files were modified, you will find. Manually deleted like this: Shift + Delete.
If you downloaded the program yourself, then just delete it as you usually delete files.
This video will show you how to remove Xmrig.exe from your computer. If you still need help we have a detailed guide to help you with all the steps.
Frequent problems
Users from time to time may have various problems with the miner. Some are associated with drivers, others with the peculiarities of the algorithm.
For example, an error with the algorithm looks like this wrong algo, use randomx miner. It occurs when the wrong syntax of the algorithm is entered or it was not possible to change it. Also, the problem may appear due to strong overclocking of the video card.
The problem low difficulty share speaks of an incorrectly matched pool port. Assignments come with erroneous difficulty. Choose a pool based on your hardware. Please note that for a farm with high-performance cards, medium-performance processors, and just one card or home computer, different port categories are issued.
The error cryptonight_extra_cpu_finak indicates a system overload. Therefore, you need to reduce the size of streams and blocks.
Conclusions
In this article, we looked at how to work with this program. It has very extensive parameters for optimizing the process of mining cryptocurrencies.
Make sure you run the xmrig file before you edit the rx field. It shows up after you run it the first time.
Releases
- Fixed READY threads
X/Xdisplay after algorithm switching. - Updated
GhostRiderdocumentation. - Fixed
cn-heavyin 32-bit builds. -
GhostRider: set correct priority for helper threads. -
RandomX: don’t restart mining threads when the seed changes. -
GhostRider: added support forclient.reconnectmethod. - Fix for short responses from some Raptoreum pools.
- Fixed
GhostRiderbenchmark on single-core systems. - Fixed
ARMv7compilation. -
KawPowOpenCL: use separate UV loop for building programs.
- Fixed crash on CPUs supporting VAES and running GCC-compiled xmrig.
-
GhostRideralgorithm (Raptoreum); - VAES optimizations not supported by
xmrig-6.16.1-linux-x64.tar.gzdue old compiler, please usexmrig-6.16.1-linux-static-x64.tar.gzinstead. - RandomX Benchmark.
- KawPow release notes
- Stay tuned about updates, follow me on twitter - https://twitter.com/xmrig_dev
- Configuration wizard
- Management panel for miners
- For NVIDIA CUDA mining support, use any regular version with CUDA plugin.
