NVFlash Windows 10 x64: Download, Guide and Commands
In this tutorial, you will learn how to set up and use NVFlash v5.735.0 and newer.
Download for Windows/Linux
Download from TechPowerUp Download from guru3d
What is NVFlash?
NVFlash - is a program for flashing the BIOS of Nvidia video cards. It is used to update the firmware stored in the EEPROM of the video adapter. The application also allows you to save copies of the current BIOS to a file or display its version.
NVFlash supports flashing BIOS on the following NVIDIA graphics cards:
- GeForce RTX 3090, RTX 3080, RTX 3070, RTX 3060 Ti, RTX 3060
- GeForce RTX 2080 Ti, RTX 2080, RTX 2070, RTX 2060, GTX 1660, GTX 1650
- GeForce GTX 1080 Ti, GTX 1080, GTX 1070, GTX 1060, GTX 1050
- and many more, including flashing BIOS on older NVIDIA devices.
Warning!
There is a real danger that the display adapter will not boot and cannot boot the system if the update process is interrupted due to a program crash, power failure, if you manually restart the computer, or if you update the adapter with the wrong firmware image. For this reason, care should be taken when using this utility.
How to use NVFlash
Step 1 - Download the software
Download the program from the official TechPowerUp website. Or download from release with guru3d. 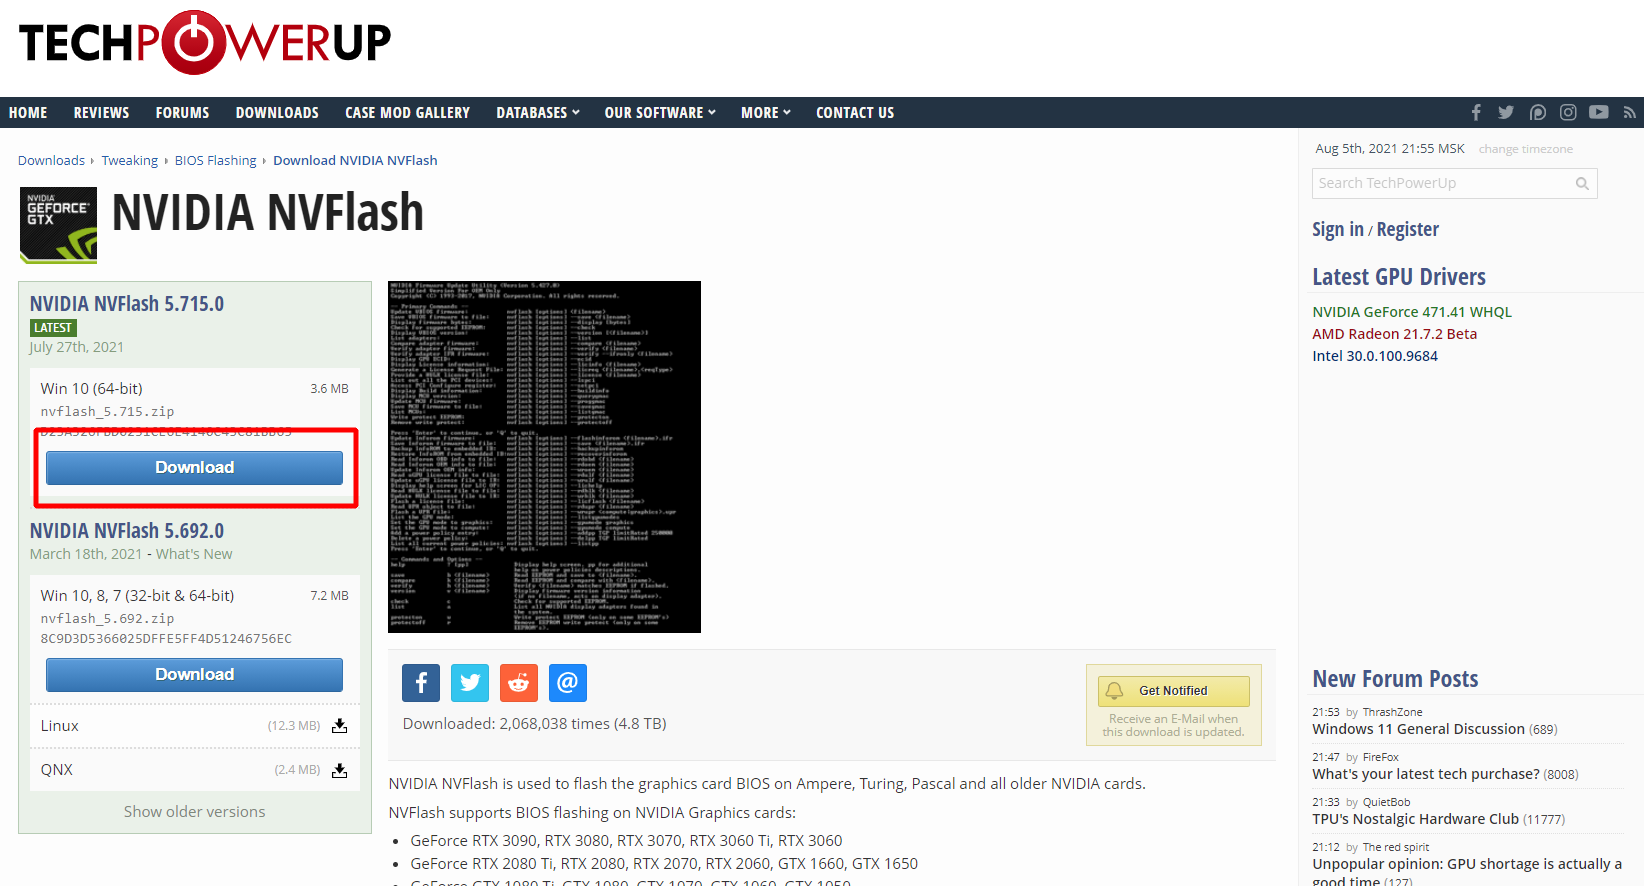
Step 2 - backup your BIOS
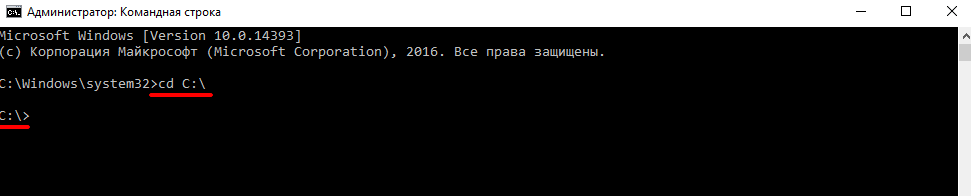
Extract the .zip archive to the root of your system drive C. The file nvflash64.exe must be in the path C:\.

Run Command Prompt as Administrator.
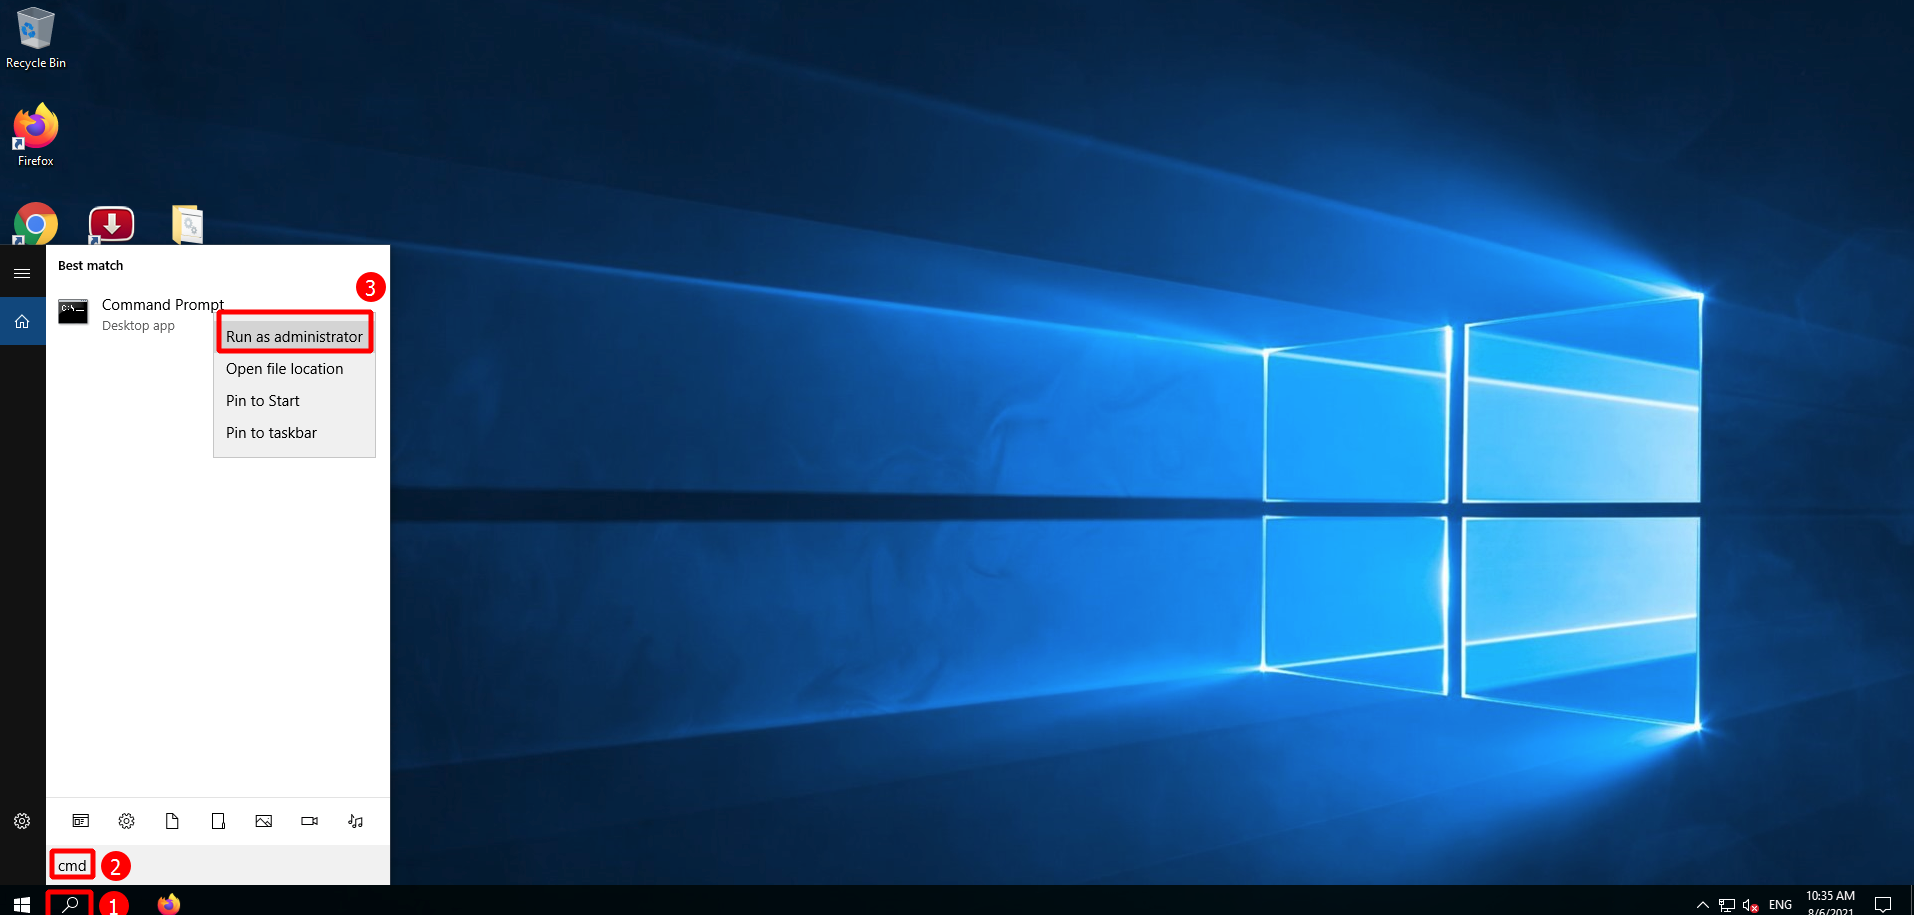
- Click on the search icon.
- Type in the bottom search bar
CMD. - Select "Run as administrator".
nvflash64.exe. To do this, enter the command:cd C:\
The result of executing the command:
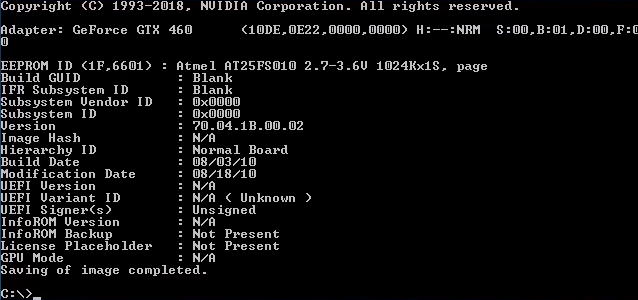
Now, save a copy of the current BIOS of your graphics card. Enter the command:
nvflash64 -b bios.rom
You will see a window like this. A copy will be stored on disk C:.
If your program is not called nvflash64.exe, but nvflash.exe, then use this name in commands.
Step 3 - flash new BIOS
In the same command line, remove the protection from flashing with the command:
nvflash64 -protectoff
You will see the inscription Remove EEPROM write protect complete:

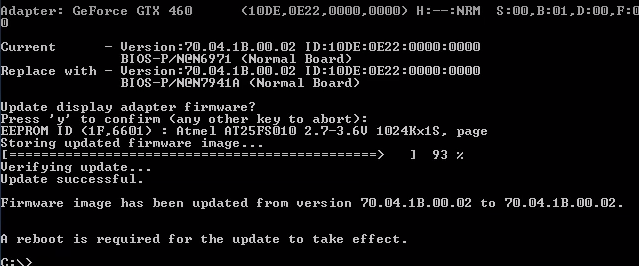
Flash the video card with the new BIOS. It must be on the disc C: and have a title newbios.rom. Enter the firmware command:
nvflash64 -6 newbios.rom
The program will report: Update successful.
And then you need to restart your computer - A reboot is required for the update to take effect.
Video Tutorial
Does not work?
If the program doesn’t work or doesn’t see your graphics card, try the following steps.
protectoff
Возможно вы забыли снять защиту:
nvflash64.exe --protectoff
Force flash
Use the f key if you need forced flashing.
nvflash64.exe -f -5 -6 bios.rom
You can cancel all checks using the following command:
nvflash64.exe -j -4-5-6 bios.rom
The numbers here are device identifiers in the system.
No nvidia display adapters found
With this error, the program does not see the video card. You need to explicitly specify which device name you want to flash (device bus ID).
nvflash64 with the key -а should list ALL good GeForce video adapters.
To do this, try to find out the device bus ID and flash it again with the command:
nvflash64 -4 -5 -6 newbios.rom
Also try using NVIDIA NVFlash version with board ID mismatch disabled.
Video Guide: How to fix your bricked GPU, How to flash your Nvidia GPU VBIOS (Video bios)
Commands
Attention!
To use these commands, [options] you must fill in your parameters instead , if necessary. The word itself [options] and parentheses are not written!
Example:
nvflash64 --list
The list of supported commands is shown below.
-
nvflash64 [options] <filename>- Update VBIOS firmware. -
nvflash64 [options] --save <filename>- Save VBIOS firmware to file. -
nvflash64 [options] --display [bytes]- Display firmware bytes. -
nvflash64 [options] --offset [start]- Change the start address. -
nvflash64 [options] --string- Display firmware bytes in ASCII. -
nvflash64 [options] --check- Check for supported EEPROM. -
nvflash64 [options] --version [<filename>]- Display VBIOS version. -
nvflash64 [options] --list- List adapters. -
nvflash64 [options] --compare <filename>- Compare adapter firmware. -
nvflash64 [options] --verify <filename>- Verify adapter firmware. -
nvflash64 [options] --verify --ifronly <filename>- Verify adapter IFR firmware. -
nvflash64 [options] --ecid- Display GPU ECID/PDI. -
nvflash64 [options] --licinfo <filename>- Display License information. -
nvflash64 [options] --licreq <filename>,<reqType>- Generate a License Request File. -
nvflash64 [options] --license <filename>- Provide a HULK license file. -
nvflash64 [options] --lspci- List out all the PCI devices. -
nvflash64 [options] --setpci- Access PCI Configure register. -
nvflash64 [options] --buildinfo- Display tool building information. -
nvflash64 [options] --querygmac- Display GMAC MCU version. -
nvflash64 [options] --proggmac <filename>.rom- Update GMAC MCU firmware. -
nvflash64 [options] --savegmac <filename>.rom- Save GMAC MCU firmware to file. -
nvflash64 [options] --listgmac- List GMAC MCUs. -
nvflash64 [options] --protecton- Write protect EEPROM. -
nvflash64 [options] --protectoff- Remove write protect.
Attention!
So that if the command is specified, <filename> you must enter the file name. The word itself <filename> and parentheses are not written!
Example:
nvflash64 [options] <filename>
It is written like this:
nvflash64 -b bios.rom
This option -b allows you to make a BIOS backup.
Full commands list
It is important to understand before reading the list that this list of commands comes in two flavors: the long command name and its short synonym.
You only need to select and use one command option:
- Or a long command name.
- Or a short synonym.
For example, if two commands are specified:
save b <filename>
We use either:
save
or:
b <filename>
Instead of <filename> you need to print the name of your file without parentheses.
Example:
b MyAwesomeBios.rom
Complete list of options:
help - Display help screen.
Press pp for additional help on power policies descriptions.
Press app for additional help on app profile descriptions.
save b <filename> - Read EEPROM and save to <filename>.
compare k <filename> - Read EEPROM full content and compare with <filename>.
verify h <filename> - Verify
version v <filename> - Display firmware version information (if no filename, acts on display adapter).
check c - Check for supported EEPROM.
list a - List all NVIDIA display adapters found in the system.
protecton w - Write protect EEPROM (only on some EEPROM’s)
protectoff r - Remove EEPROM write protect (only on some EEPROM’s).
protectmain - Write protect the main firmware segment of the EEPROM.
protectlock - Set status register protect and status register lock.
protectinfo - Display the block protection status.
license <license file> - Provide a license file for updating VBIOS.
licinfo - Display license file content. license file is provided by --license option.
ecid - Display GPU ECID/PDI.
licreq
lspci - List all the PCI devices in the system.
setpci <R.W>[=D[:M]] - Read/Write PCI Config register.
Format is: <REG.WIDTH>[=DATA[:MASK]]
Read operation: <REG.WIDTH>
Write operation: <REG.WIDTH>=DATA[:MASK]
progfwovercec <type> <filename> [flag1 flag2] - Flash firmware <filename> over CEC
<type> : "gmac", "rtu", "bmc" or "gpu"
[flag] : "reset" or "offpreservecfg"
- reset : Optional flag to request CEC perform a reset when finished.
- offpreservecfg : No config preservation.
querycec <filename> - Display crypto device information
attestcec [filename] [csv], - Request FW attestation to CEC and save the response data to [filename],and verify the fields in [csv].
listcec <filename> - List all the CEC devices
cmpgmac <filename> - Read MCU Flash ROM and compare with <filename>.
proggmac <filename> - Flash GMAC MCU firmware (AI).
savegmac <filename> - Read GMAC MCU firmware (AI) andsave to <filename>.
listgmac - List all the GMAC MCU devices
querygmac [
listgpuled - List all the GPU LED Lighting MCUs.
proggpuled <filename> - Flash GPU LED Lighting MCU firmware (AI).
querygpuled <filename> - Display GPU LED Lighting MCU FW (AI) version (if no filename, acts on GPU LED Lighting MCU).
savegpuled <filename> - Read GPU LED Lighting MCU firmware (AI) and save to <filename>.
rdciegpuled <filename> - Read CIE data from GPU LED Lighting MCUand save to <filename>.
wrciegpuled <filename> - Write CIE data to GPU LED Lighting MCU.
calibrategpuled [millisecond] - Calibrate GPU LED clock tick.
listbridgeled - List all the bridge LED Lighting MCUs.
progbridgeled <filename> - Flash bridge LED Lighting MCU firmware (AI).
Video: How To Bios Flash any NVIDIA GPU! (Unlimited Power)
Where can I get the DOS version?
NVFlash must be used in DOS mode when you boot your system. So use an MS-DOS boot disk and just copy this tool to it. download it from TechPowerUp.
Video: Flashing a GTX 765M for Mac using nvflash
Error pci subsystem id mismatch
The PCI subsys identifier is the card model. Please use the DOS version to resolve the error.
Also make sure that you have unlocked the BIOS:
nvflash64 -protectoff
Use the key -6:
nvflash64 -6 vbiosname.rom
The command -6 will allow you to undo the PCI Subsystem ID mismatch. In case of inconsistency, you need to confirm the action using the “y” key.
Note. Users with non-US keyboards may need to press “z” or similar, because “y” is not in the same place for all keyboard layouts.
SLI users will need to flash each card separately. The concept remains the same, but you will need to use the appropriate adapter index to flash the card. How to determine the adapter #. described above.
The flashing is done like this:
nvflash64 -i [index] -6 vbios.rom
[index] is a number, namely the index that you found with the command nvflash64 -a.
So, an example of a command for flashing a card with index 0:
nvflash64 -i0 -6 vbios.rom'
When the monitor starts flashing, just wait until a message appears that you are done. Then reboot with Ctrl + Alt + Del and remove the USB stick.
Command format not recognized
What to do in this case? It’s simple, the program tells you that you entered the wrong command. Check each letter again and correct any mistakes.
Is not recognized as an internal
Make sure you run the command from the folder where it is located nvflash64.
Relevance and alternatives
- NVIDIA nTune - no BIOS flashing required.
- RivaTuner - no BIOS flashing required.
- NVIDIA BIOS Editor 6.06 (NiBiTor) - you need to flash.
- ThrottleStop - no need to flash.
- GPU-Z - no need to flash.
