AMD VBFlash / ATI ATIFlash: Download, How to use
In this tutorial, you will learn how to set up and use ATIFlash v3.31 and newer.
Download for Windows / Linux
Download from TechPowerUp Download from SourceForge
What is ATIFlash?
ATIFlash - is a small utility used to flash BIOS on GPUs. Able to work only with ATI video cards. The utility supports absolutely all AMD Radeon video cards, including the well-known RX580, RX 6800XT and others. The application works under Windows as well as DOS and Linux.
AMD VBFlash was originally called Atiwinflash. However, after the release of version 2.7.1, it was simply renamed Atiflash. The 274 version was already well known under this name.
Supported video cards:
RX 6900 XT, RX 6800 XT, RX 6700 XT, RX 5700, RX 5600, RX 5500. You can also flash the BIOS for all AMD Radeon RX Vega, RX 580, RX 480, and all older ATI cards.
Tool requirements
- ATIFlash, a tool for flashing AMD graphics cards.
- TechPowerUp GPU-Z.
- An existing BIOS backup file.
- New BIOS version.
How to Use ATIFlash?
Step 1 - Download the program
Download the program from the official TechPowerUp website. Or download the release from SourceForge. Select the software for the required operating system. 
Step 2 - Make a BIOS backup
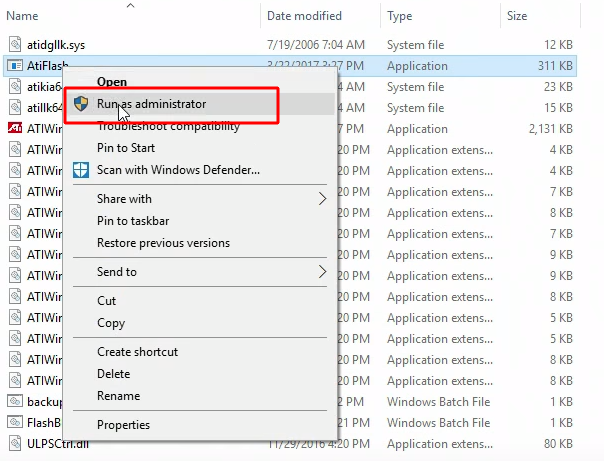
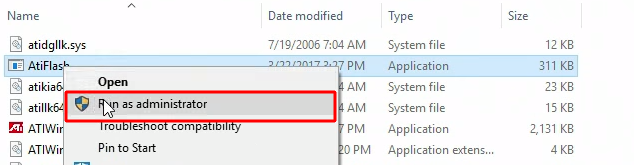
Extract the .zip archive and run amdvbflashWin.exe. Right-click and select "run as administrator."
Click the "Save" button for the video card selected above.
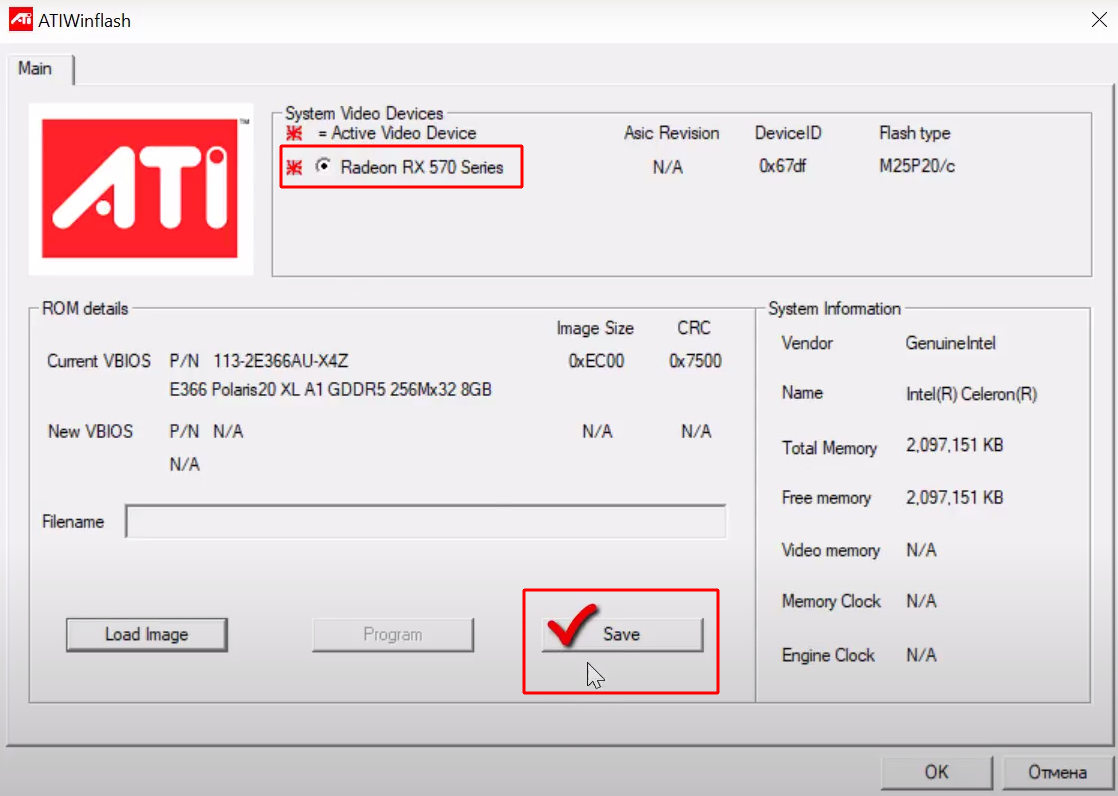
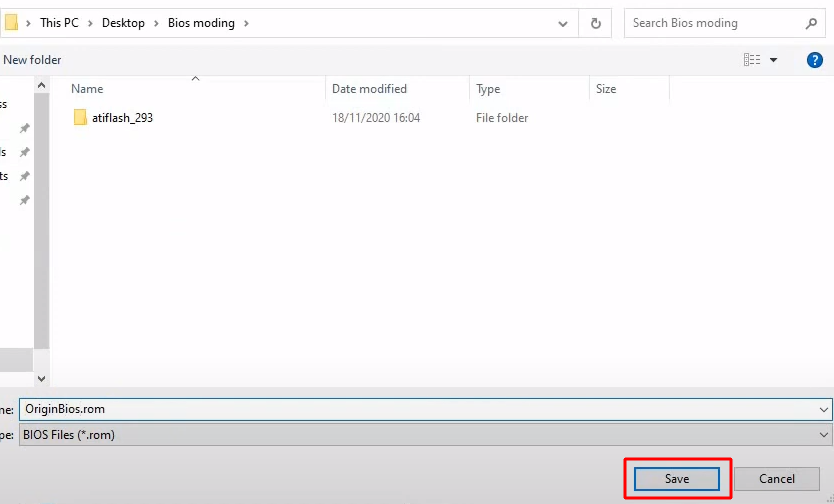
A window for selecting a path for saving will open. Enter a name to save. For example original_bios.rom. Or save it as the name of your graphics card. For example: OnginBios.rom.
If saving the native BIOS is successful, you will see the inscription "ROM image saved to file". Click "Continue".
Step 3 - Flash the new BIOS
Run the program as administrator and click Load Image.
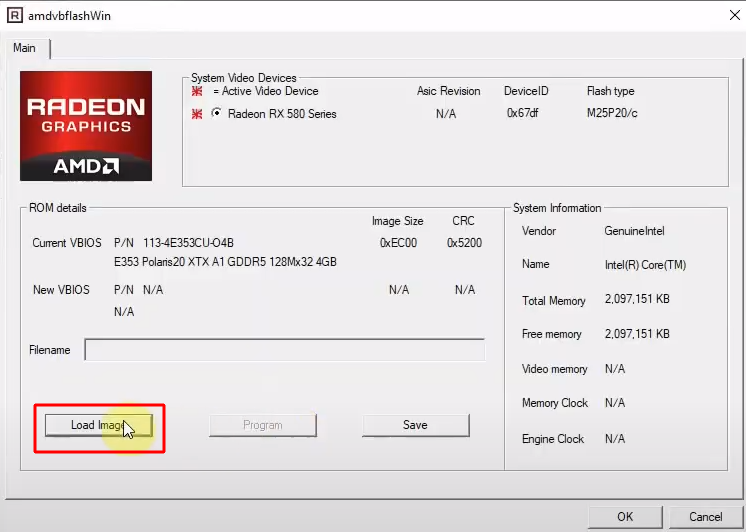
Make sure to select the correct BIOS and the video card you want to flash. Click Open. By the way, the PolarisBiosEditor program will help you choose the BIOS.

In the field Filename ou will see the full path to the new BIOS version. Click Program to start the firmware process.
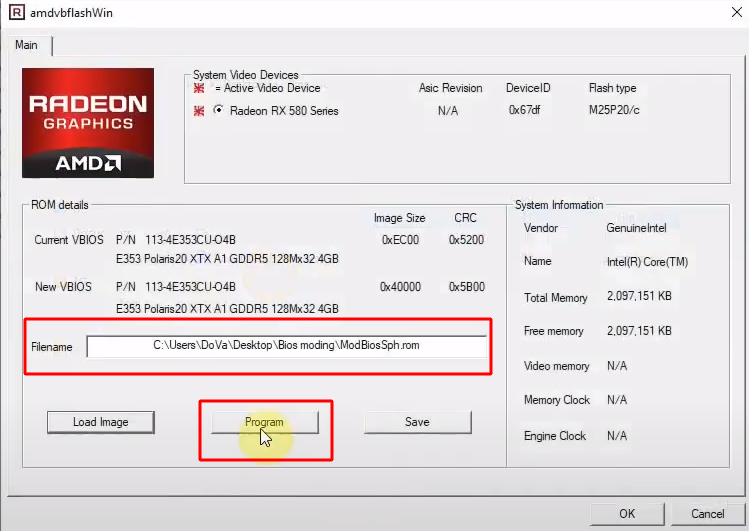
Wait for the process to go through.
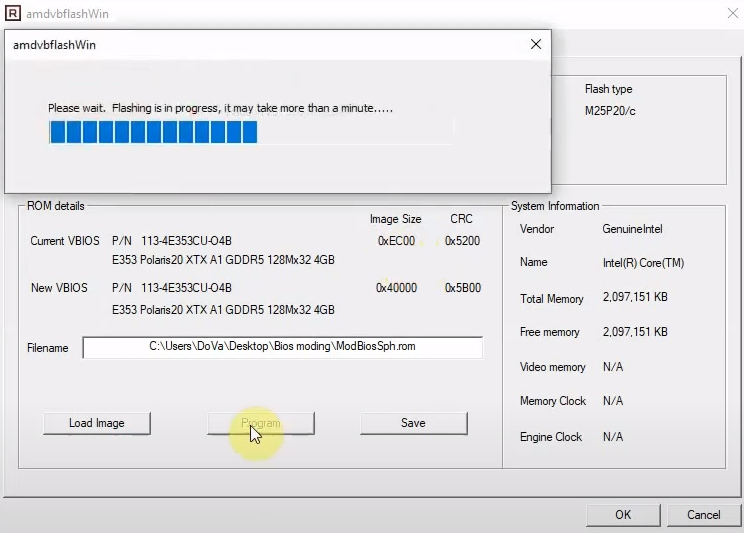
If successful, the program will inform you: Your VBIOS was programmed successfully:

Click OK. You should now do a reboot - You have to reboot this system before the changes take effect. Click "Yes".
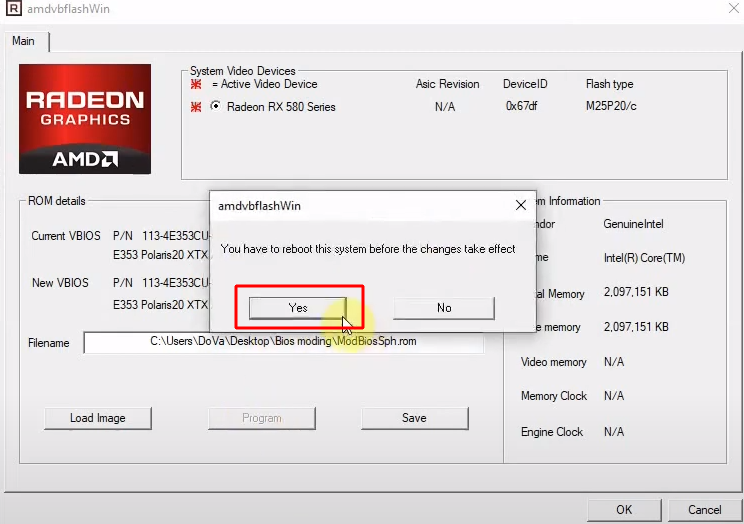
Done.
Video Guide
If you see error 43 after flashing, then you need to apply Atikmdag Patcher.
Let’s consider the second variant of DOS firmware.
The program also works from the command line and in DOS. You can use the .bat file or you can use the CMD.
This option is more complex, but more reliable because the command shell is less likely to crash than the graphical one.
How to flash through the command line (DOS)?
Step 1 - Download the softwareу
Download the program from the official TechPowerUp website. Or download the release from SourceForge. Select the software for the required operating system.
Step 2 - Make a backup of the BIOS
Extract the .zip archive. Create two .bat files:
- BackupBios.
- FlashBIOS.
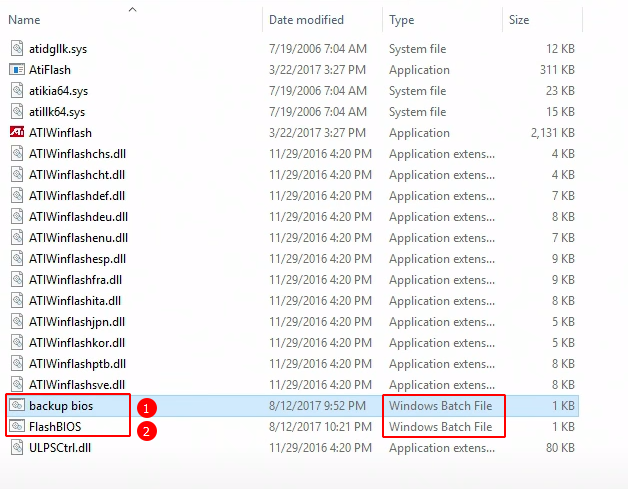
One will be used to create a backup, and the second for the firmware of the new version.
Run BackupBios.batt to keep the original BIOS. Here are the contents of this file:
@echo off
cls

echo Saving bios to BIOS_backup.rom...
echo.
AtiFlash -s 0 BIOS_backup.rom
echo.

pause
If you do not have this file, create it. Copy the text into notepad and give an .txt extension instead .bat
If the file does not start, then first run amdvbflash.exe as administrator.
Do this if you see a window like this: "Due to Microsoft Win8 Enhanced Security Features, this Application requires the user to be in Administrator mode. To Enable this mode, please right click the mouse on the application, then select "Run as Administrator". 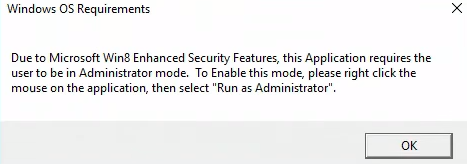
Now start by BackupBios.batt double clicking on it. The folder will appear BIOS_backup.rom.
Step 3 - Flash the BIOS of the video card
Now start by FlashBIOS.bat double clicking on it. Here is the content of the file:
@echo off
cls

echo Flashing card 0 with BIOS.rom...
echo.
AtiFlash -p 0 -f BIOS.rom
echo.

pause
During startup, you will see the following window:
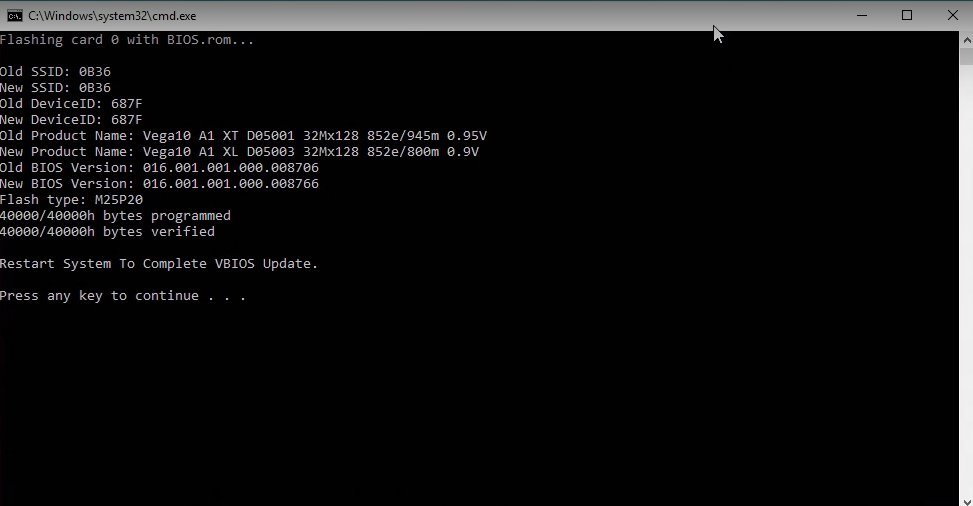
Inscriptions programmed and verified will inform you that everything is OK.
Now the utility will inform you "Restart System To Complete VBIOS Update" - we restart the PC.
BIOS flashing AMD cards with DOS
Not working on windows 10
If the program doesn’t work or doesn’t see your graphics card, try the following steps.
- Download the new version of the program.
- Use Bootable DOS Drive Method.
The program may not work in 10k on a certain system assembly
In this case, use either an earlier version of the 10k build, or sew from Strelec WindowsPE.
It has long been known that GPU makers place certain blocks on performance. When it comes to gaming or mining, the performance indicator should be as close as possible to 100-110%.
Commands
Here we will highlight the most useful commands:
command format:
Atiflash [command] [parameter1] [parameter2] [parameter3] [command]
Observe all spaces. However, command brackets are NOT written).
Example:
Atiflash -i 1 -t
-
-i [Num]Display information of ATI adapters in the system. Display information of adapter [Num] if specified. -
-ai [Num]Display advanced information of ATI adapters on system. Display advanced information of adapter [Num] if specified. -
-biosfileinfo <File>Displays the Bios info in file<file> -
-p <Num> <File>Write BIOS image in file<file>to flash ROM in Adapter. -
-pa <File>Write BIOS image<file>to all appropriate adapters. -
-s <Num> <File> [Size]Save BIOS image from adapterto file ` `. First [Size] kbytes (except for Theater in bytes) of ROM content is saved if [Size] is specified. -
-cf <File> [Size] [Sum]Calculate 16-bit checksum for file<file>. Checksum for the first [Size] kbytes of the file is calculated if [Size] is specified. -
-cb <Num> [Size] [Sum]Calculate 16-bit BIOS image checksum for adapter<Num>. Checksum for the first [Size] kbytes of the ROM content is calculated if [Size] is specified. -
-cr [Size] [Sum]Calculate 16-bit ROM checksum for adapter and compare it to the [Sum] specified. This command is the same as *-cbif[Size]is specified. -
-t <Num>Test ROM access of adapter<Num>. -
-v <Num> <File>Compare ROM content of adapter<Num>to<file> -
-mi [ID]Modify SSID & SVID in BIOS image of adapter to . SSID & SVID in BIOS image of adapter is displayed if [ID] is not specified. -
-mbModify SSID, SVID, BIOS Pin Number, & Boot Message in BIOS image of adapter<Num>to values in.
Example:
ssid = 715B
svid = 1002
biospn = "113-xxxxxx-xx"
bootmsg = "ATI graphic board"
-pak <File> Package an executable for BIOS update according to the commands in <File>.
Example config file:
outfile = update.exe
banner = "Update v1.0"
infile = a123.bin
command = -pa -padevid=715B infile
-
-isr <Num> <Build Number> <Board Number>Set ISR number based on the given build and board number if not specified, print out ISR Number. -
-prod <Num> <12 digit serial number>Set PROD number based on the given serial number if not specified, print out SN Number. -
-checkprodsn <Num> <12 Digit Serial Number>Comparing the Prod SN based on existing prod sn saved in ROM.
Options
-
-fForce flashing regardless of security checkings (e.g. AsicID & BIOS file info check OR boot-up card). -
-faForce flashing bypassing already-programmed check. -
-fmForce flashing bypassing BIOS memory config check. -
-fsForce flashing bypassing BIOS SSID check. -
-fpForce flashing bypassing BIOS P/N check. -
-sstUse SST25VFxxx flashing algorithm regardless of ROMID straps. -
-stUse ST M25Pxx flashing algorithm regardless of ROMID straps. -
-atmelUse AT25Fxxx flashing algorithm regardless of ROMID straps. -
-keepisrsnkeep the ISR Number on the adapter when flashing a new VBIOS. -
-keepprodsnkeep the Prod SN on the adapter when flashing a new VBIOS. -
-siiresetSpecifies the GPIO Pin to be used as the Reset when updating SiI1930 microcontroller firmware.
Example:
-siireset=7 <No Spaces>-
-siiuprogSpecifies the GPIO Pin to be used as the uprog when updating SiI1930 microcontroller firmware.
Example:
-
-siiuprog=14 <No Spaces>. -
-scansiiOverrides normal adapter detection to enable detecting SSI roms with/without TPI firmware. -
-log Logsoutput to atiflash.log, overrides existing file. -
-logappendLogs and appends output toatiflash.log. -
-ddc EnableDDC support. -
-padevid=<ID>Use with -pa command to update adapters of specific device ID. -
-passid=<ID>Use with -pa command to update adapters of specific SSID. -
-pasvid=<ID>Use with -pa command to update adapters of specific SVID. -
-pavbpn=<VBPN>Use with -pa command to update adapters of specific VBIOS PN.
-excl_memtrain_dtable When flashing on new VBIOS, a pre-determined memory training data table in the old VBIOS will not be overwritten.
-isr <adapter num> [build num] [board num] If build number and board number are specified, sets the ISR Number value in specified adapter. If only adapter is specified, the current ISR Number is displayed.
-checkpn <adapter num> <filename> Checks PN of the current product and compares it to external file.
*<Num> = adapter number,
<File> = filename
*[Size] = data block size in KBytes, except for Theater Pro in Bytes
*Use command -i to see the adapter numbers in the system. *Theater Pro supports commands -i, p, s, cf, cr, t, v and options -f, -noremap.
Alternatives
- ATI Winflash
- Программа Flashrom
- Radeon BIOS Editor (Due to the digital signature requirement on the latest AMD cards, RBE is no longer in active development and will not support the latest graphics cards.
Overview of program features
The utility is freely available free of charge. Supported on Windows XP and higher, up to the latest, tenth.
The utility has two modes of operation: through the command line (CMD) and the graphical shell (GUI). You can use any of the methods to update the BIOS. Before carrying out the procedure, be sure to download the BIOS of the required version for your device.
Do not turn off your computer while updating. Otherwise, a failure in the system will lead to the failure of the GPU. Also Atiflash DOS can keep the current firmware. If you run into problems with the new version of the software, it will help you roll back to the previous version.
The BIOS firmware should be changed for several reasons:
- To increase the performance of the video card.
- Change voltage parameters with power consumption.
- To set up a system for mining cryptocurrency.
The software copes with each of the tasks.
The subtleties of the firmware through the graphical shell
Note that this method is only suitable if there are three GPUs in the system. Not more. Otherwise, the utility is not able to show all subsequent ones. Therefore, in this situation, it is worth using the command line. More about this above.
The video card must not only be displayed in Device Manager, but also fully functional. Otherwise, the AMD driver has blocked the custom BIOS.
If you have several identical AMD video cards in your system , then you need to specify the flashing of all video adapters with the same BIOS. Use the file where the modified BIOS is located (for example, BOIS_mod.rom). The command will look like this:
atiflash.exe-pa BIOS_mod_480.rom.
If you have two different GPUs in your system: R9390 and RX 5700, then run the utility with the key –i. View a list of all displayed graphics adapters. Remember the number of the required video adapter. In the command line, write:
Atiflash.exe -video adapter number
Suppose it has parameter 1. Then the command looks like this:
atiflash.exe –p 1 BOIS-mod_480.rom
Troubleshooting
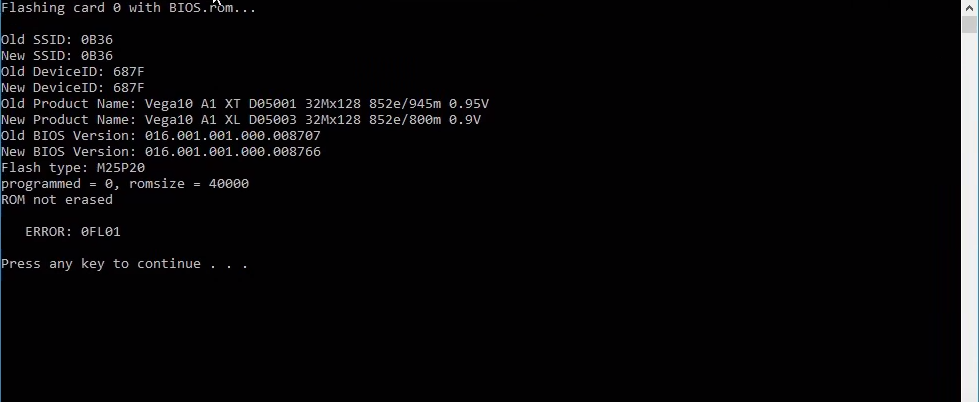
Error 0fl01.
Freezing of the GPU or system when flashing BIOS. When updating the BIOS of the video adapter, you must disable it using the “Device Manager”. Also try restarting your computer.
After completing the BIOS update and restarting the PC, the graphics processor is detected, but does not work. There are manufacturer’s drivers that block the operation of the video adapter with an unsigned BIOS.
If you see the inscription: not found adapter - check the correct operation of the video card in the Device Manager.
Old version
Versions
Video: Solving the Subsystem ID Mismatch error when flashing the BIOS of a video card, RX 570 580 5700
This video shows how to correctly and easily resolve the Subsystem ID Mismatch error when flashing the BIOS of an AMD based graphics card. There are other methods, more complicated and tricky, but using this method it will be possible to avoid bugs and further problems with the video card.
The subsystem mismatch error indicates the wrong choice of firmware or its size. Then it is worth copying the data through Polaris BIOS Editor to the desired file format.
This problem occurs when you try to flash the BIOS of a video card with a BIOS file from another video card or an incompatible BIOS chip model.
Downloads
Old versions:
