OverdriveNTool: Download and how to use
In this tutorial, you will learn how to set up and use OverdriveNTool v0.2.9 and newer.
Download for Windows / Linux
Download from SourceForge Download from Guru3d
What is OverdriveNTool?
OverdriveNTool - is a program for configuring the parameters of AMD graphics cards. The application changes the frequency indicators of the video card. In addition, the user has the ability to control the voltage. It can also be programmed to reduce the voltage consumption when the set temperature is reached. This reduces the risk of equipment overheating.
Supported video cards:
290, 290x, 380, 380x, 390, 390x, Fury, Fury X, Nano, 4xx, 5xx series (RX 580, RX 570), Vega 56, Vega 64.
Requirements
- OS: Windows 7,8,10 and later builds.
- Graphics card: currently supported 290, 290x, 380, 380x, 390, 390x, Fury, Fury X, Nano, 4xx, 5xx series, Vega 56, Vega 64).
- Driver: minimum 17.7.2 and later.
How to use?
Step 1 - Download the program
Download the program from the official source SourceForge. Or download the release from Guru3d. 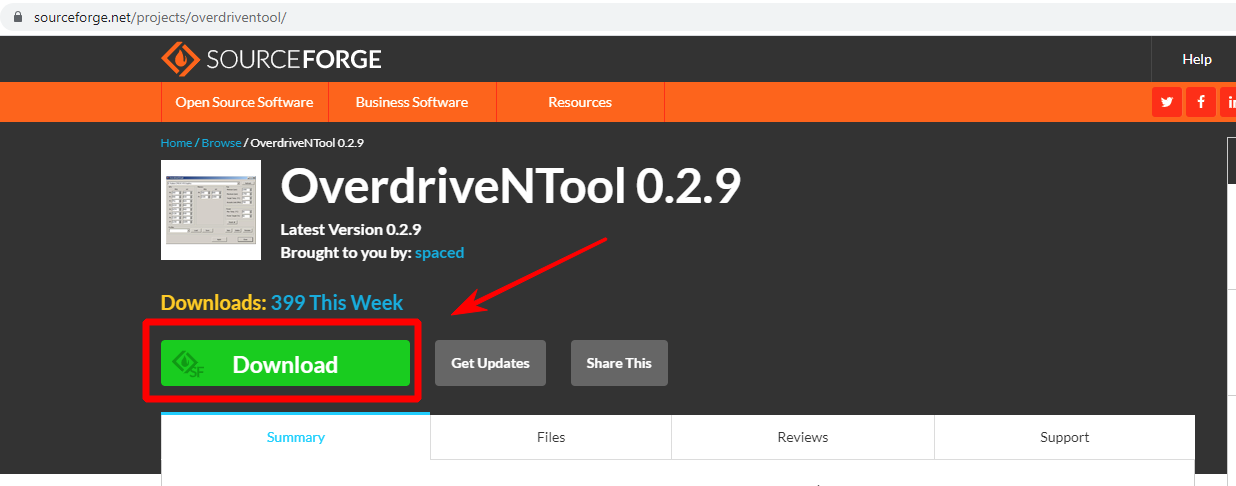
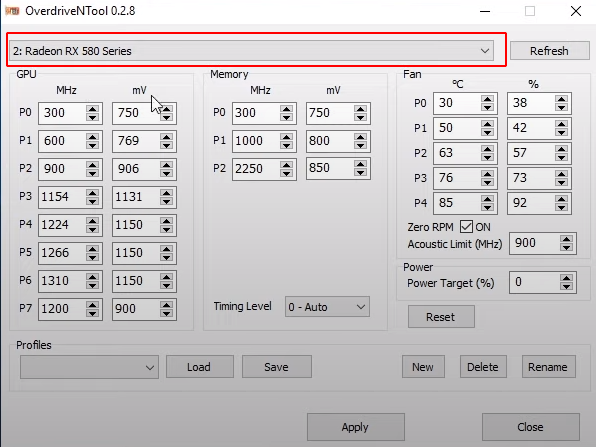
Step 2 - Run the program
To run it, you must first extract the zip archive. Any folder on your hard drive will do. It is advisable to create a new one that will be used only for overclocking.
Run the program and select the model of your video card in the upper field:
Step 3 - Specify New Timing and Overclocking Settings
We indicate new indicators to overclock the equipment.
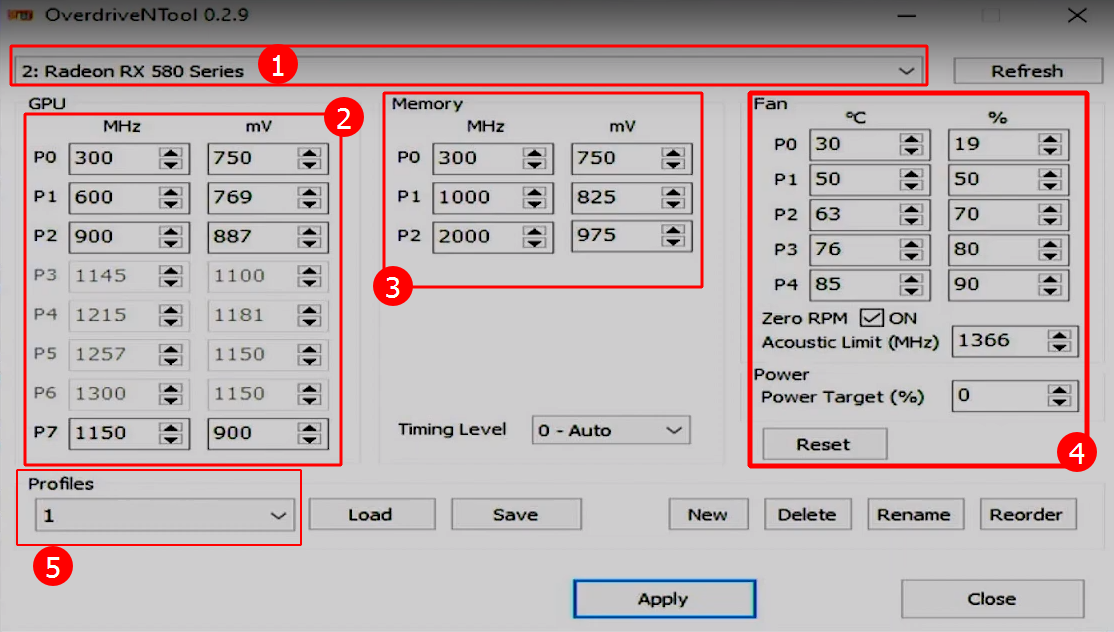
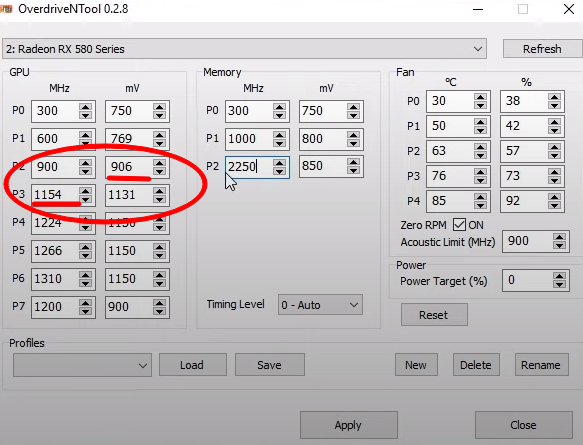
- Choosing a video card.
- Kernel overclocking settings. On the left are Megahertz, on the right are Millivolts.
- Memory overclocking settings. On the left are Megahertz, on the right are Millivolts.
- Fan speed control.
- Saving settings in a profile.
By clicking on the "Save" button you will save your Profile Settings in .ini.
The "Apply" button is used to apply the set performance indicators.
Video instruction
How to find undervolt values
AMD GPU downvolting values are based on the preset table. It’s on the right side of the utility (mV).
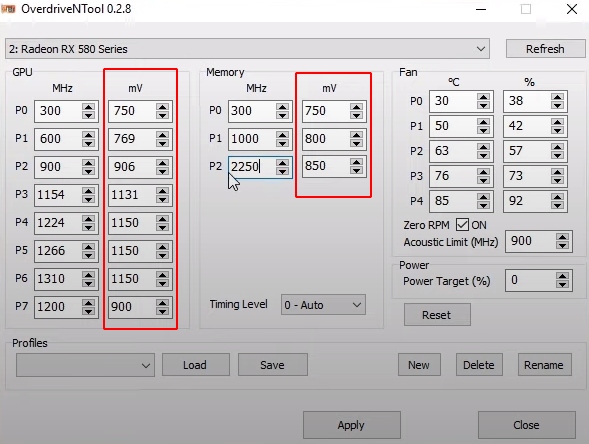
The essence of the selection of indicators is quite simple. Take the voltage from the lower category, for example 900 mV.
For example, you can get stability in the operation of the GPU with a frequency of 1153 MHz, when the voltage is 906 mV. In reality, the GPU operates with 2 voltage categories less. However, stability cannot be guaranteed. Therefore, each time it is necessary to carry out individual testing.
In other words, it is necessary to take the voltage from the lower stage, and the frequency from the upper one minus one.
The required indicators are entered into the utility and saved. During the initial creation, the system will recommend creating a file with a profile. In all the following settings for each video card or new profile, you will have to create a separate data file yourself. To do this, use the icon New.
By launching the utility and clicking on the menu that opens, the data of all video cards in the system are shown. Even those that are not supported by the utility are shown. If you select it, the program will warn you as a message This GPU is not supported, that is, this GPU is not supported. To work with such cards, you need MSI Afterburner along with a special BIOS firmware for the video adapter.
Fan control settings
In the settings, the required cooler speed indicators are additionally set. For the minimum, it is optimal to set 50-60% of the maximum allowable value.
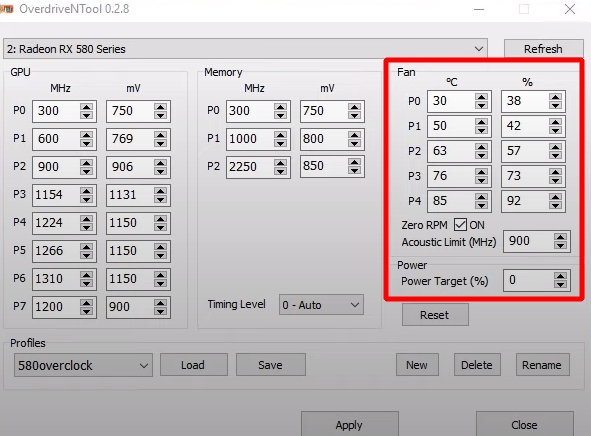
The desired and maximum allowable temperature is also indicated. Electricity consumption is limited.
Zero RPM metric provides quiet operation with low GPU load and is enabled by default. The fans should spin up when the GPU is under load and the temperature rises. Zero RPMs are automatically disabled if any changes are made to Radeon ™ WattMan.
How to find power target values
Leave it zero % to draw normal TDP values. Set negative % to lower power draw. most people use -10 to -30 with stock BIOS. Max temp is when it will start to throttle speeds.
Power target actually an offset percentage so theoretically if you were to input 70 you would actually be telling the program you want a max power draw of ~240 Watts.
Profiles
By clicking the save button, the system automatically creates a file with the extension .ini, which indicates the entered overclocking values and the rest of the graphics processor settings. To view all profiles, you need to expand the list of the corresponding name. To edit the settings, just run it .ini through a text editor or Word.
Downloading and checking the functioning of the selected profile will not take much time. Select it and click Load.
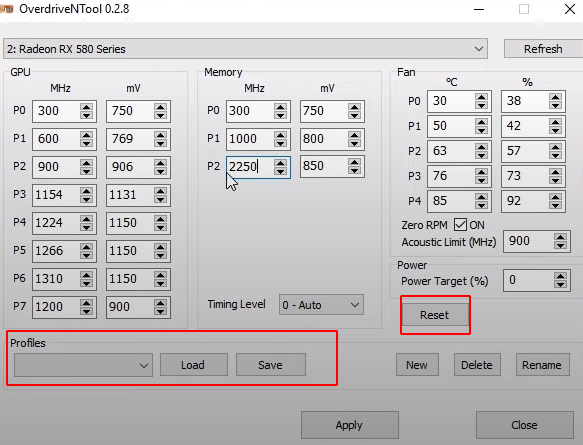
You can study the factory settings only after pressing the Reset button.
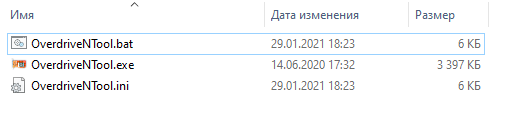
- The file that allows you to run the utility automatically has the extension
.bat. It is not there by default. You need to create it yourself. - A file with profiles, where overclocking settings, voltage drop, cooler speed and temperature indicators are recorded (
overdriventool.iniappears automatically when at least some profile is saved).
Startup
For the program to start automatically, a .bat file is created with the following content:
@echo Overdrive downvolt setting up

@echo off

timeout 15

OverdriveNTool.exe -p0"0" -p1"1" -p2"2" -p4"4" -p5"5"
-
-pfrom zero to 5 are the numbers of the GPUs; - the values in quotation marks
""0 through 5 are the names of the profiles applied to these video cards.
The shortcut to this file can be placed in startup -
C:\Users\Username\AppData\Roaming\Microsoft\Windows\Start Menu\Programs\Startup
Replace Username with the system username. This folder is located on your hard drive C.
How to reset
To restore the work of the graphics processor when there were failures, in the old version of the utility it was required to add a command to the batch file –r. This made it possible to reset the settings of the video card to those set by the manufacturer. It looks like this:
-r5
Here 5 means the number of the video adapter.
After the release of 0.2.7, the restart is performed in automatic mode until the required parameters are set. The .bat file for autorun in the old version looks like this:
@echo Overdrive downvolt setting up

@echo off

timeout 15

OverdriveNTool.exe -r0 -r1 -r2 -r3 -r4 -r5

timeout 15

OverdriveNTool.exe -p0"0" -p1"1" -p2"2" -p4"4" -p5"5"
The timeout indicator is set individually. It depends on how quickly the system boots. For a hard disk, the time is about 30-50 seconds, while for an SSD, 5-20 seconds are enough. If the timeout time is too short, then the batch file settings will not be applied. Then an error. Therefore, do not rush to save a second for the optimal regime. After all, this way you can mess up all the settings of the GPU.
Example ini file for RX 580
[Profile_rx580]

Name=0

GPU_P0=300;750

GPU_P1=466;818;0

GPU_P2=751;824;0

GPU_P3=1019;830;0

GPU_P4=1074;840;0

GPU_P5=1090;840;0

GPU_P6=1110;840;0

GPU_P7=1160;840

Mem_P0=300;750

Mem_P1=1000;800

Mem_P2=1950;860

Fan_Min=1500

Fan_Max=2280

Fan_Target=75

Fan_Acoustic=1411

Power_Temp=85

Power_Target=0
5700 and 5700 xt
This is how I decided to reset the voltage on for my 5700 and 5700 xt.
I created a script for my mining farm, in which, after restarting Windows, OverdriveNTool will disable / enable my cards before launching the software for miners (since they are known to sometimes reset after a crash, and this leads, for example, to too much power consumption)…
However, some cards did not give up and reset the voltage to some random number after pressing the “Apply” button. I found out that the new driver is to blame. So, I found a combination that works for me:
- Version - OverdriveNTool 0.2.9.0
- Driver - win10-radeon-software-adrenalin-2020-edition-20.4.2-apr23
When I installed the older 20.4.2 driver and also disabled Windows Updates, “AMD Crash Defender Service” and “AMD External Events Utility” via services.msc, I can finally use my .bat script to automatically overclock and start the miner without any problems after Windows crash.
I just noticed that I can no longer run the Adrenaline driver as it says my drivers and AMD software are not the same. Maybe it’s because my AMD reinstall was not completely clean as I didn’t delete the old AMD directory, but who cares, I don’t need it anymore.
Alternatives
Is there a version for Nvidia? No, there are alternatives. For example:
Use without a profile
It is easy to use the program without a profile file. To do this, you need to specify in the batch file all the values for the subsequent overclocking of the graphics processor. For this, the following line fits:
-ac[gpu_id] GPU_P[num]=[value];[value][;0] Mem_P[num]=[value];[value][;0] Fan_Min=[value] Fan_Max=[value] Fan_Target=[value] Fan_Acoustic=[value] Power_Temp=[value] Power_Target=[value]
-ас installed with the key –р. All the indicators that were written further are applied, without applying the profiles from the .ini file.
If the indicators are value not registered, then the system will automatically ignore them.
In this situation, you need to specify the required indicator number pstate(num). In this case, the first is value indicated as the core frequency. The second value displays voltage. Note that the unit of measurement here is millivolts.
On a line, [;0] indicates the indicator is disabled Pstate.
If you specify the * frequency or voltage of video memory or core, the utility will ignore this indicator.
The timing level parameter optimizes memory latency settings to unlock some additional performance on certain (non-gaming) workloads.
In Linux, you can change the P-state values for the kernel and VRAM in the same way as overclocking in Windows using OverdriveNTool. To manually change the overclocking parameters, you must first run the command:
sudo echo "manual"> / sys / class / drm / card0 / device / power_dpm_force_performance_level
Command line parameters
[gpu_id] - it’s the first number taken from GPU description, for single video card it’s 0 "Name" - name of the profile that was saved ealier, must be quoted if has spaces inside
example:
OverdriveNTool.exe -p0myProfile -p1"Profile 2"
-
-p[gpu_id]"Name"- apply profile"Name"to GPU withid=[gpu_id] -
-c[gpu_id]"Name"- same as above, but with confirmation message that application started and everything went ok. -
-r[gpu_id]- reset GPU withid=[gpu_id] -
cp[gpu_id]"Name"- compare current values of GPU withid=[gpu_id]with profile"Name", and eventually set this profile if not equal -
cm[gpu_id]"Name"- compare current values of GPU withid=[gpu_id]with profile"Name", and eventually set this profile if not equal, with additional message if not equal found -
co[gpu_id]"Name"- only compare current values of GPU withid=[gpu_id]with profile"Name", with message if not equal found -
-consoleonly- displays all messages (eg. errors) in cmd.exe console window, instead of gui messages. Only commands that are put after-consoleonlyare affected, example:"OverdriveNTool.exe" -consoleonly -r0 -p0"1" -r1 -p1"1" -r2 -p2"2" - will affect all commands "OverdriveNTool.exe" -r0 -p0"1" -r1 -consoleonly -p1"1" -r2 -p2"2" - will affect -p1"1" -r2 -p2"2" commands only -
-showgui- when added to commandline normal GUI will be displayed after program finishes with all other commands. -
-wait[miliseconds]- program waits specified time before parsing next command, useful if you want to add some delay for example on windows startup, can be used multiple times in one commandline.
example:
OverdriveNTool.exe -wait3000 -r0 -wait500 -p0profile1
In this example application starts without gui, then sets "myProfile" to GPU with id=0 and "Profile 2" to GPU with id=1 and then exit.
commands can be used all together, for example:
OverdriveNTool.exe -p0myProfile -r0 co1"Profile 1"
On configs with more than 10 GPUs [gpu_id] must have 2 digits, for GPUs 0-9 leading 0 must be added, example:
00,01,02,03,04,05,06,07,08,09,10,11,12. Usage example: -p05"Name"
It’s possible to use * as [gpu_id], which means it affects all supported GPUs, example:
-r* -p*MyProfile -p2"Custom profile" cm*MyProfile
Advanced:
-ac[gpu_id] GPU_P[num]=[value];[value][;0] Mem_P[num]=[value];[value][;0] Fan_Min=[value] Fan_Max=[value] Fan_Target=[value] Fan_Acoustic=[value] Power_Temp=[value] Power_Target=[value]
-ac is similar to -p command, applies values but without using profiles. Format is identical to ini profile. All not specified values will remain untouched. Can be used with other commands (-consoleonly, * as [gpu_id], -r, -p… etc.)
[num] - Pstate number, using # as [num] will apply to highest available Pstate for scpecified GPU [value] – value, for GPU and memory PState first value is clock (MHz), second is voltage (mV), third optional ;0 makes this Pstate disabled.
Putting * as Memory or GPU value will skip applying this value, for example: -ac0 GPU_P7=*;800 Mem_P3=1000;* (only applies GPU_P7 voltage=800mV and Memory P3 clock=1000MHZ) -ac0 GPU_P4=*;*;0 (only disables GPU_P4 without changing it’s values)
For I2C settings use –ac with Offset=[value] LLC=[value] PhaseGain=[value] CurrentScale=[value]
I2C must be enabled and supported for specified GPU, otherwise it will not work. Offset value is multiplied by 6,25mV, so 10 = +62,5mV, -5 = -31,25mV
Example:
-ac0 Offset=10 LLC=0
-ac0 Offset=-5 LLC=1 PhaseGain=000000 CurrentScale=60
Commands example:
-ac0 GPU_P7=1200;800 Mem_P2=1000;850 Fan_Min=1080 Fan_Max=1700 Fan_Target=70 Fan_Acoustic=700 Power_Temp=90 Power_Target=50 -ac1 GPU_P#=1200;800 Mem_P#=1000;850
-ac0 GPU_P7=1200;800;0 Mem_P3=1000;850 Fan_Min=1080 Fan_Max=1700
-consoleonly -r5 -ac5 GPU_P#=1200;800 Mem_P#=1000;850 Fan_Min=1080 Fan_Max=1700 -ac4 Fan_Target=70 Fan_Acoustic=700 Power_Temp=90 Power_Target=50
-ac* Power_Target=-1 GPU_P7=*;*;0
-wait1000 -r0 -ac0 GPU_P7=1200;800 Mem_P1=700;850;0 Mem_P2=750;850;0 Mem_P3=800;850;0 Mem_P4=1000;850 Fan_Min=1080 Fan_Max=1700 Fan_Target=70 Fan_Acoustic=700 Power_Temp=90 Power_Target=50

```batch
-ac0 Power_Target=50 -ac1 Power_Target=-50 -ac2 Fan_Max=1700 Fan_Min=1080 -ac1 Fan_Acoustic=700
-getcurrent - prints current values for all supported GPUs in cmd console window.
-t[gpu_id]
restart GPU with id=[gpu_id]. It’s similar to devices manager enable/disable GPU. Useful for immediately apply registry changes done to AMD keys like SoftPowerPlay table. It requires admin rigths to work.
Troubleshooting
Driver is detected as not installed / loaded - The program has detected an incompatible driver. Make sure you have selected the AMD graphics card in the upper field of the program.
If the program says: “gpu not supported” - try to remove the drivers completely through the display deiver unistaller and stop them.
- Work around the bug in the driver 17.7.2. which appears when using the default voltage instead of the programmed ones. If it occurs, reset everything and reapply the profile.
- Can be off / on. any state P. Here you need to click on P0, P1, etc. If this state is disabled, then the video card will not use it.
-
I2Ccan currently support IR3567B. This includes the RX470-480 series, as well as individual RX5xx. Also there is support for up - If you don’t want to change the cooler settings. Then disable this section in all video cards. This can be done as follows: press CLTR + double-click in the cooler window. It will be saved according to the video card ID. Due to this, the graphical interface or commands will not be able to affect the configuration of the cooler for the installed video card.
- To open the settings or the SoftPowerPlayTable editor, double-click the program icon. It is located at the top left. You can also right-click on a title.
- To change the “friendly name”, you need to enable it in the settings. Then press RMB on the list of video cards to open the menu.
Old versions
0.2.9 (14.06.2020)
- fixed: Application recognizes driver not installed in 20.5.1 (or newer)
- added profiles with reordering
0.2.8 (04.16.2019)
support for fan curve and memory sync level introduced in driver 18.12.2 (removed min, max fan, target fan temp and power temp) * added command -wait
- added the ability to apply or reset all supported GPUs at once using Ctrl + Apply or Ctrl + Reset fixed a bug with duplicating graphics processors and profiles when using the command
-showgui
Conclusions
This utility is hosted on the official resource at SourceForge, not on GitHub. There is also a discussion thread at techpowerup.
Despite the fact that the program is released only in English, it will be understood by anyone who has worked with utilities designed to overclock GPUs before.
For effective mining, you need to use the capabilities of the video card at full capacity. It is quite simple to work with the program.
